|
Page 4 of 6
|
|
Toyota MR2 (SW20) Page 4 |
|
Updated on 04/29/02 |
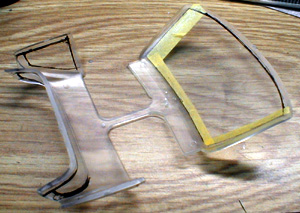 The
window trim is always a headache of all car modelers. I used a permanent
ink pen and French curve to draw the boundary lines as shown.
Then I masked the parts and hand painted black from inside with Tamiya
enamel paint. The
window trim is always a headache of all car modelers. I used a permanent
ink pen and French curve to draw the boundary lines as shown.
Then I masked the parts and hand painted black from inside with Tamiya
enamel paint. |
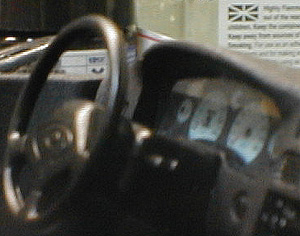 The
gauges were custom made. The gauges were printed by Alps printer,
and it was cut and trimmed to fit the dashboard part. After that,
clear cover was made from clear plastic, and it was glued with clear
glue. The result is the reflection on the gauge assembly as shown. The
gauges were custom made. The gauges were printed by Alps printer,
and it was cut and trimmed to fit the dashboard part. After that,
clear cover was made from clear plastic, and it was glued with clear
glue. The result is the reflection on the gauge assembly as shown. |
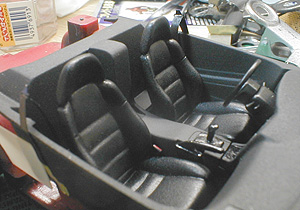 It's
a common practice to add the seatbelt and buckle. I painted Tamiya's
masking tape black, and cut to the right width. Then, I used photo
etch seat belt hardware to represent the pretensioner. The buckle
was made from plastic sheet, and it was painted black and the button was
painted orange. It's
a common practice to add the seatbelt and buckle. I painted Tamiya's
masking tape black, and cut to the right width. Then, I used photo
etch seat belt hardware to represent the pretensioner. The buckle
was made from plastic sheet, and it was painted black and the button was
painted orange. |
 Although
the order is mixed up, I forgot to mention that I used Modeler's interior
color black for the tub and the dashboard. This spray leaves a
texture on a smooth plastic. The seat was painted with semi gloss
black, and it was rubbed with a finger, after paint was completely dried. Although
the order is mixed up, I forgot to mention that I used Modeler's interior
color black for the tub and the dashboard. This spray leaves a
texture on a smooth plastic. The seat was painted with semi gloss
black, and it was rubbed with a finger, after paint was completely dried.
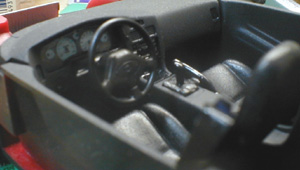
Make sure you glue the mirror to the inside of the windshield. I forgot, and had to use tweezers to glue it. |
|
Toyota MR2 (SW20) Page 4 |
|
|