LINUX USB 起動方法 #2

● (No.916-b) LINUX USB 起動方法 #2 (2019年1月4日)
------------------------------------------------
Windows10 から Ubuntu 18.10 をインストールしてみた。
以前よりも、全てが容易に、しかも遥かに進化している。
下記サイトを熟読した後に、18.04 に変更して再インストールし直した。
USB起動のつもりが、以下の手順で進み、PC本体に LINUX Ubuntu 18.04
をインストールしてしまったみたいだ。 Windows と LINUX が共生して
いる。BOOT の最初で、OS を切り替えるようになった。
0. http://unetbootin.github.io/
http://sicklylife.jp/ubuntu/1804/settings.html
http://sicklylife.jp/ubuntu/1810/settings.html
http://linuxfan.info/ubuntu-18-10-install-guide
http://linuxfan.info/ubuntu-18-04-japanese-input
http://sicklylife.jp/ubuntu/tsukaikata/usage.html
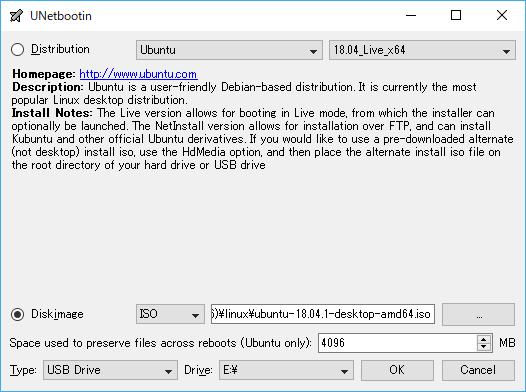
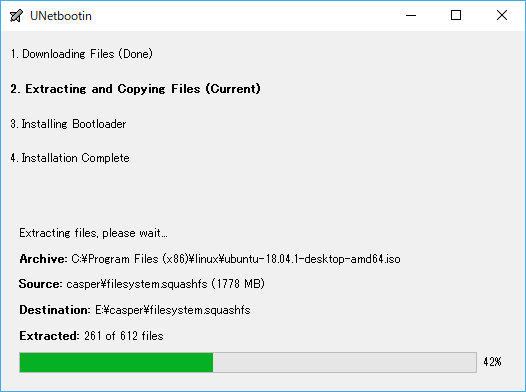
1. Download: unetbootin-windows-661.exe
2. Download: ubuntu-18.04.1-desktop-amd64.iso
3. Change up to USB Boot (USB HDD) in Windows 10
4. Run unetbootin-windows-661.exe
5. Input ubuntu-18.04.1-desktop-amd64.iso in ISO field
6. Run Ubuntu from USB after installing Ubuntu-18.04.1
7. and Select "install Ubuntu" of the second row from the top
8. Select English in Welcome
9. Select Japanese in Keyboard layout
10. Setting WiFi and input Password
11. Default configuration in update and software
12. Settings time zone
13. Input your information
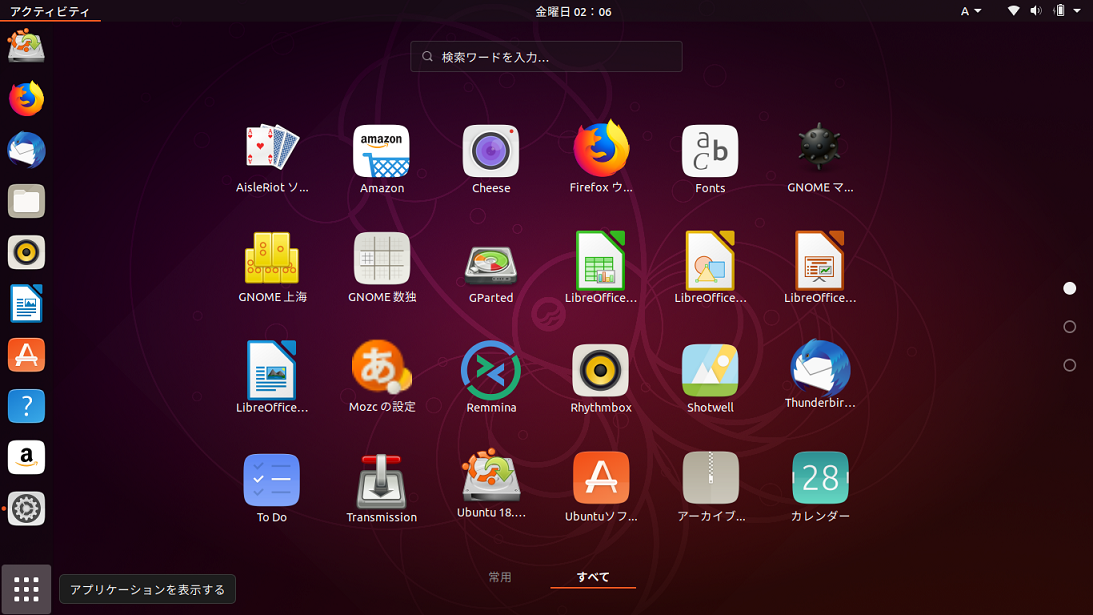
14. Click the icon in the lower left corner of Ubuntu display
15. Click File icon to see the folder structure
16. Blank screen OFF in Settings icon -> Power

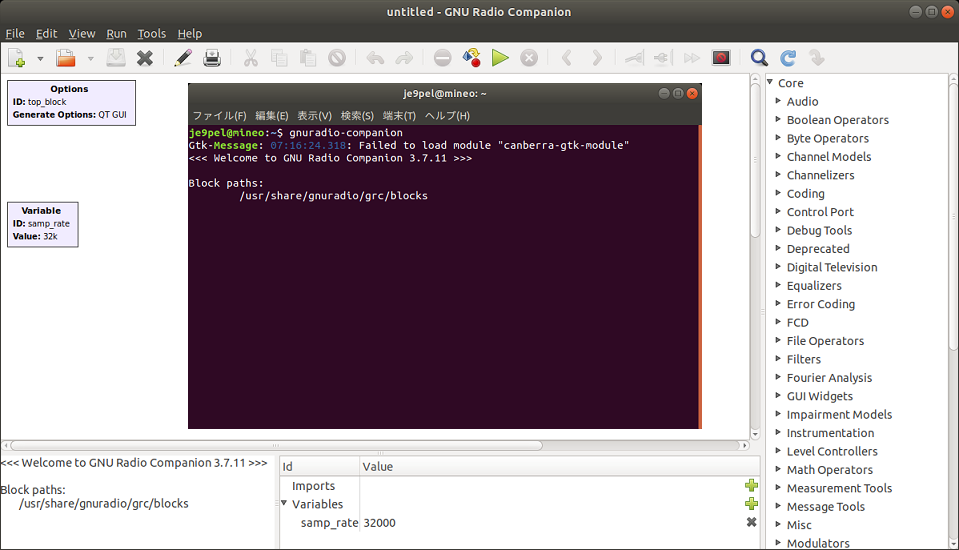
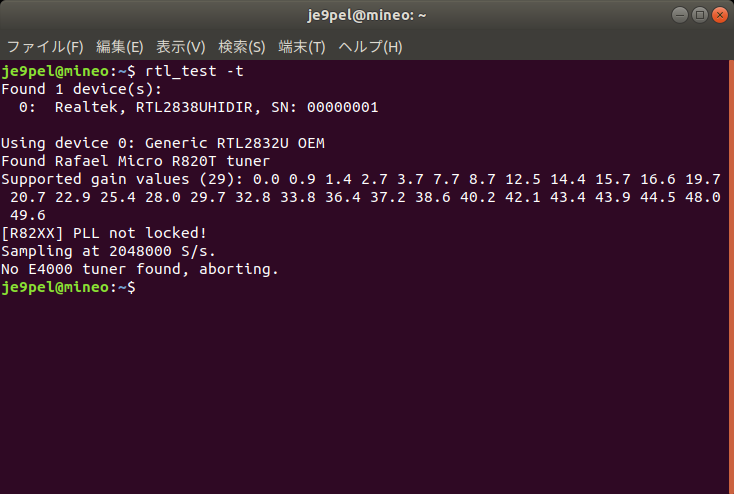
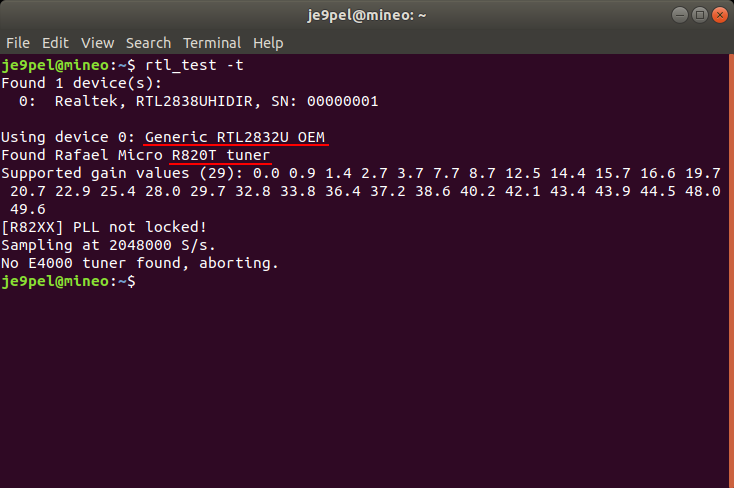
 GNURadio はインストール完了した。次に、RTL-SDR の最後のテストで
34番のエラーメッセージが返ってきた。udevルールを修正しろと……。
35~51番のように cmake し直したら、RTL-SDR を認識した!
17. GNURadio installing
18. $ sudo apt install gnuradio
19. $ gnuradio-companion
20. GNURadio 3.7.11 Launch Successfully!
21. RTL-SDR installing
22. $ sudo apt-get install git cmake autoconf automake libusb-1*
23. $ mkdir ~/sdr
24. $ cd ~/sdr
25. $ git clone git://git.osmocom.org/rtl-sdr.git
26. $ cd rtl-sdr/
27. $ mkdir build
28. $ cd build
29. $ cmake ../
30. $ make
31. $ sudo make install
32. $ sudo ldconfig
33. $ rtl_test -t
34. > usb_open error -3
> Please fix the device permissions, e.g. by installing the udev rules file rtl-sdr.rules
> Failed to open rtlsdr device.
35. $ cmake ../ -DINSTALL_UDEV_RULES=ON
36. $ make
37. $ sudo make install
38. $ sudo ldconfig
39. $ cd ..
40. $ sudo cp ./rtl-sdr.rules /etc/udev/rules.d
41. $ cd /etc/modprobe.d
42. $ sudo nano no-rtl.conf
43. Type the following 3 lines in the editor
44. > blacklist dvb_usb_rtl28xxu
45. > blacklist rtl2832
46. > blacklist rtl2830
47. [Ctrl+O (not zero)] key -> [Enter] key -> [Ctrl+x] key
48. $ sudo reboot
49. [Ctrl+ALT+T] key -> Terminal
50. $ rtl_test -t
51. RTL-SDR recognized!
GNURadio はインストール完了した。次に、RTL-SDR の最後のテストで
34番のエラーメッセージが返ってきた。udevルールを修正しろと……。
35~51番のように cmake し直したら、RTL-SDR を認識した!
17. GNURadio installing
18. $ sudo apt install gnuradio
19. $ gnuradio-companion
20. GNURadio 3.7.11 Launch Successfully!
21. RTL-SDR installing
22. $ sudo apt-get install git cmake autoconf automake libusb-1*
23. $ mkdir ~/sdr
24. $ cd ~/sdr
25. $ git clone git://git.osmocom.org/rtl-sdr.git
26. $ cd rtl-sdr/
27. $ mkdir build
28. $ cd build
29. $ cmake ../
30. $ make
31. $ sudo make install
32. $ sudo ldconfig
33. $ rtl_test -t
34. > usb_open error -3
> Please fix the device permissions, e.g. by installing the udev rules file rtl-sdr.rules
> Failed to open rtlsdr device.
35. $ cmake ../ -DINSTALL_UDEV_RULES=ON
36. $ make
37. $ sudo make install
38. $ sudo ldconfig
39. $ cd ..
40. $ sudo cp ./rtl-sdr.rules /etc/udev/rules.d
41. $ cd /etc/modprobe.d
42. $ sudo nano no-rtl.conf
43. Type the following 3 lines in the editor
44. > blacklist dvb_usb_rtl28xxu
45. > blacklist rtl2832
46. > blacklist rtl2830
47. [Ctrl+O (not zero)] key -> [Enter] key -> [Ctrl+x] key
48. $ sudo reboot
49. [Ctrl+ALT+T] key -> Terminal
50. $ rtl_test -t
51. RTL-SDR recognized!
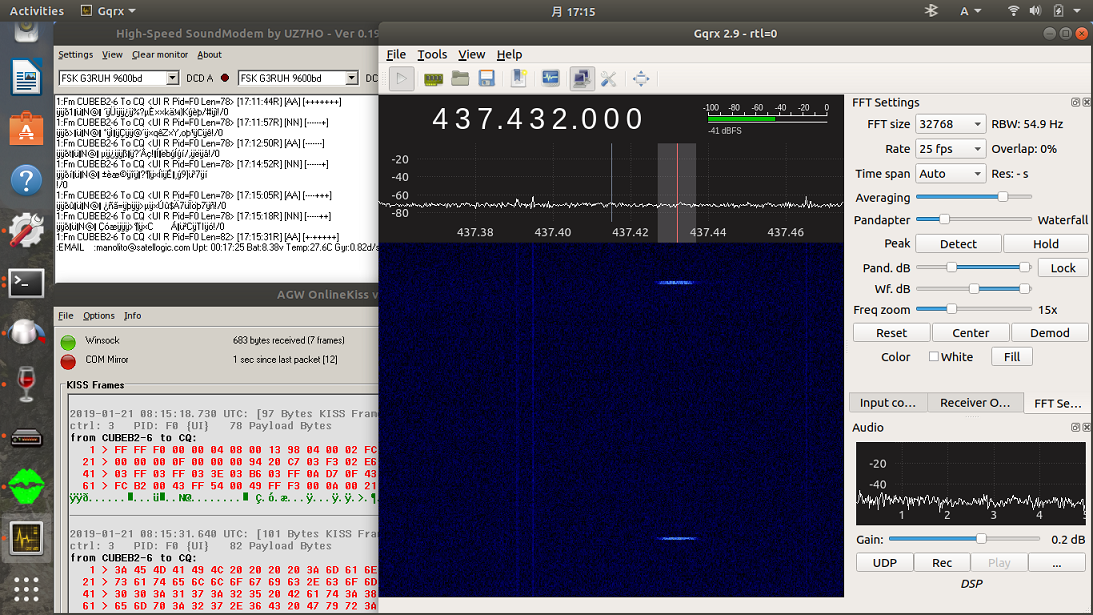
 いよいよ、信号の受信実験である。
まず、GQRX をインストールし、1200bps信号をデコードしてみた。
52. GQRX installing
53. Search in your applications -> GQRX
54. Confirm Applications -> Settings -> Sound device
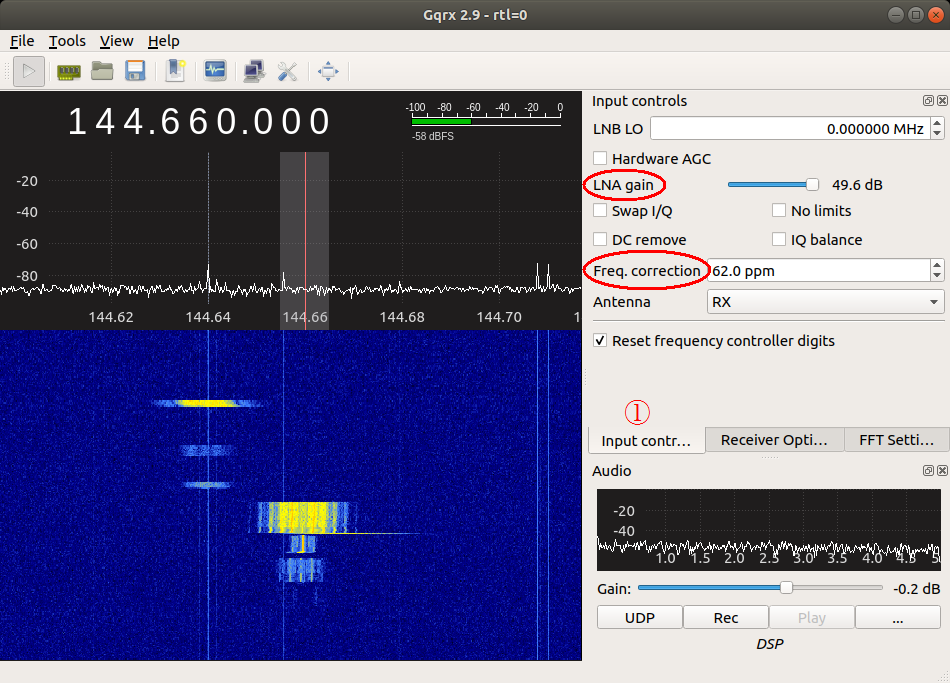
55. Confirm Device: "Realteck RTL2838UHIDUR"
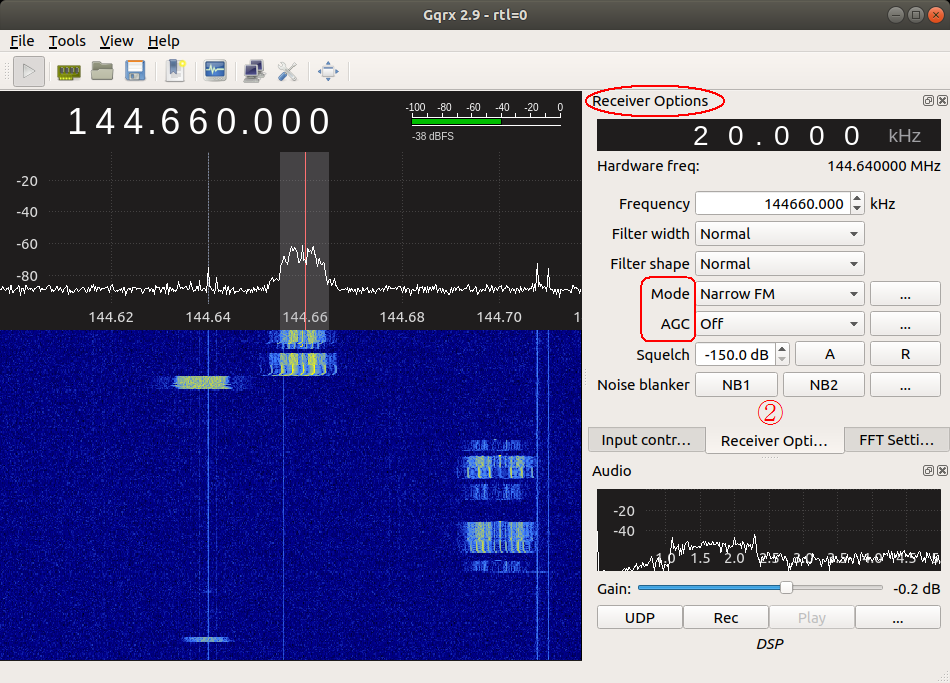
56. Setting [Input controls] -> Freq. correction: 62.0 ppm, etc.
57. Setting [Receiver Options] -> Mode: Narrow FM, AGC: Off, etc.
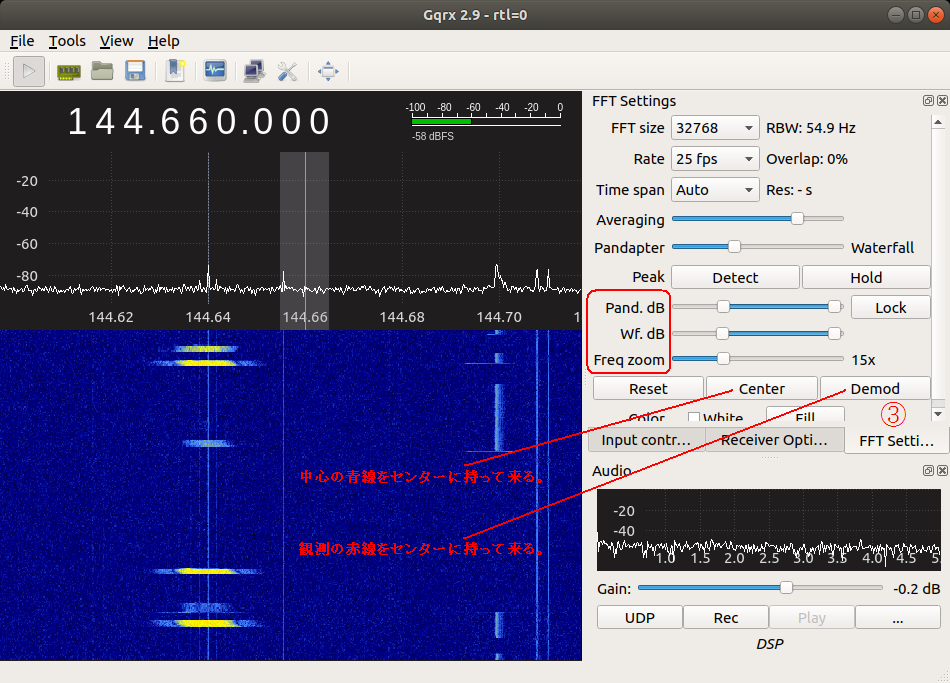
58. Setting [FFT Settings] -> FFT size 32768, Freq zoom 15x, etc.
59. Activate GQRX by clicking on the start button at the top left of display
60. GQRX -> Tools -> "AFSK 1200 Decoder"
いよいよ、信号の受信実験である。
まず、GQRX をインストールし、1200bps信号をデコードしてみた。
52. GQRX installing
53. Search in your applications -> GQRX
54. Confirm Applications -> Settings -> Sound device
55. Confirm Device: "Realteck RTL2838UHIDUR"
56. Setting [Input controls] -> Freq. correction: 62.0 ppm, etc.
57. Setting [Receiver Options] -> Mode: Narrow FM, AGC: Off, etc.
58. Setting [FFT Settings] -> FFT size 32768, Freq zoom 15x, etc.
59. Activate GQRX by clicking on the start button at the top left of display
60. GQRX -> Tools -> "AFSK 1200 Decoder"
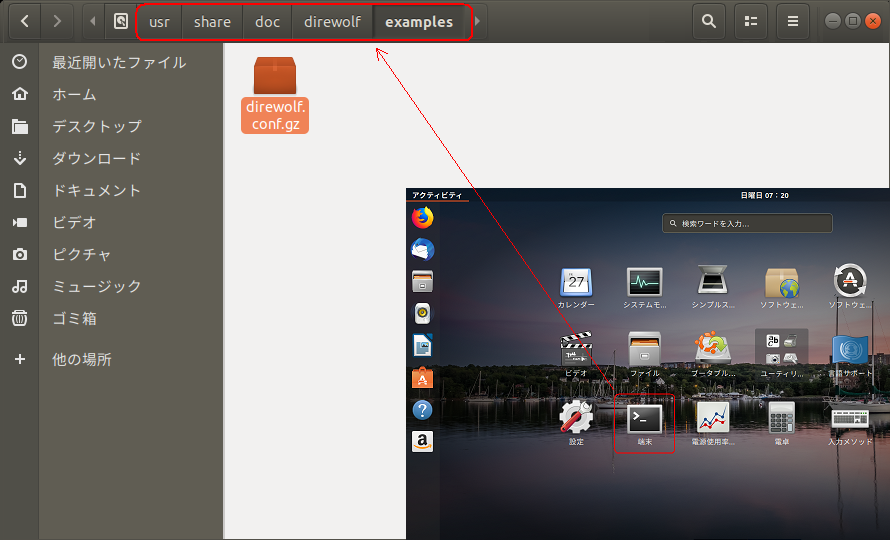
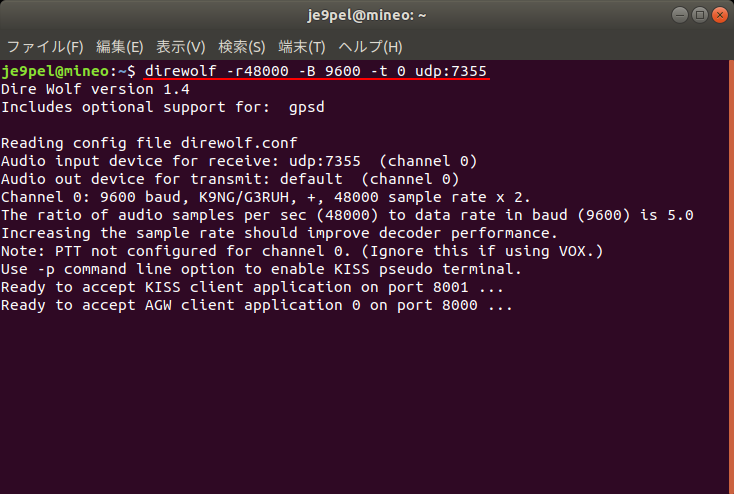
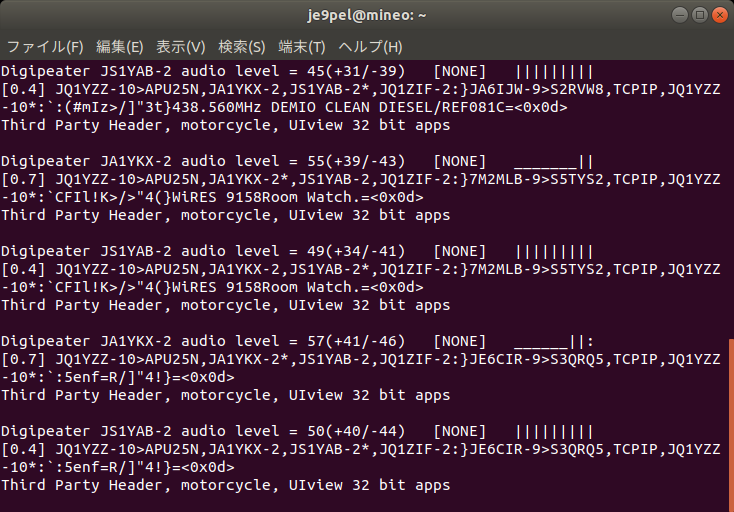
 次に、DireWolf をインストール して、9600bps信号をデコードしてみた。
63~65番で、direwolf.conf.gz をコピーし、それを展開・編集する所が味噌。
後は GQRX を起動し、UDP の設定をして 71番の一文をターミナル(端末)から
入力して DireWolf を起動すると、GQRX で受信した9600信号が DireWolf に
流れるようにデコードする。
61. DireWolf installing
62. Search in your applications -> DireWolf
63. $ cd
次に、DireWolf をインストール して、9600bps信号をデコードしてみた。
63~65番で、direwolf.conf.gz をコピーし、それを展開・編集する所が味噌。
後は GQRX を起動し、UDP の設定をして 71番の一文をターミナル(端末)から
入力して DireWolf を起動すると、GQRX で受信した9600信号が DireWolf に
流れるようにデコードする。
61. DireWolf installing
62. Search in your applications -> DireWolf
63. $ cd Home
64. $ cp /usr/share/doc/direwolf/examples/direwolf.conf.gz . (Note: last dot)
65. $ gzip -d direwolf.conf.gz
66. Generate direwolf.conf in Home folder
67. Edit MYCALL and delete "#" of the top of "MODEM 9600" in direwolf.conf
68. Press the "..." button at the bottom right in GQRX
69. Confirm UDP host: localhost and UDP port: 7355
70. Press the "UDP" button at the bottom right in GQRX
71. $ direwolf -r 48000 -B 1200 -t 0 udp:7355
$ direwolf -r 48000 -B 9600 -t 0 udp:7355
72. Then 1200bps or 9600bps signal streams as "GQRX -> UDP -> Direwolf"

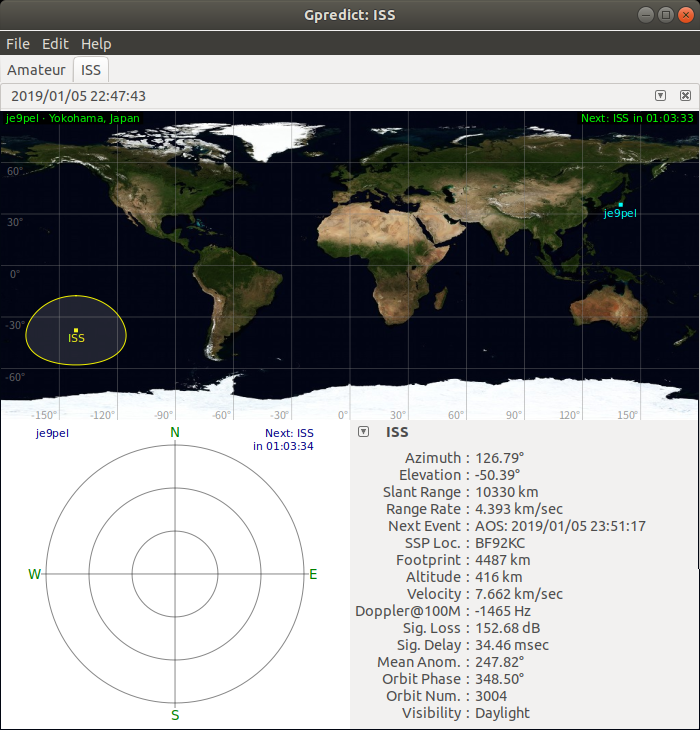
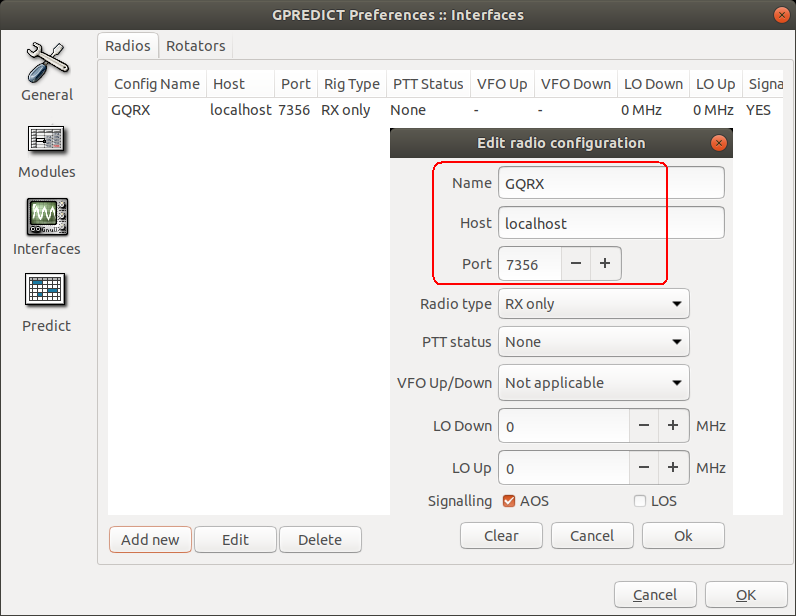
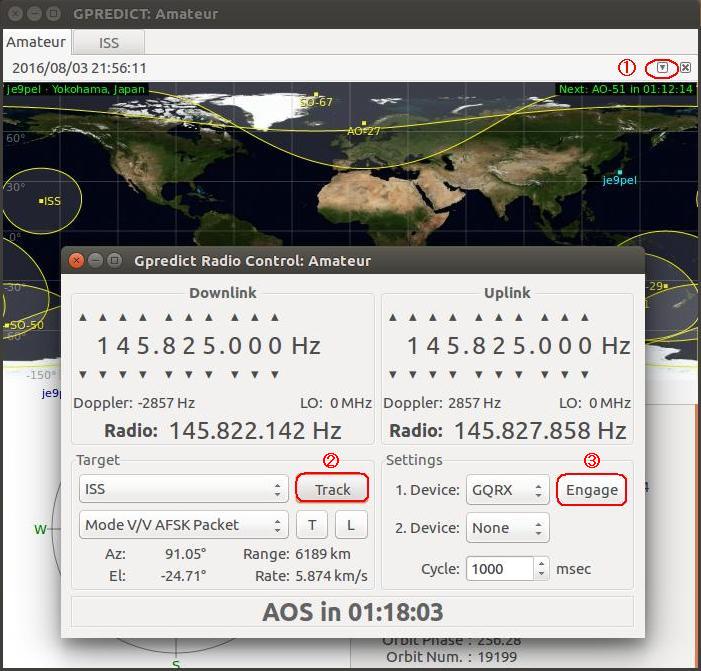
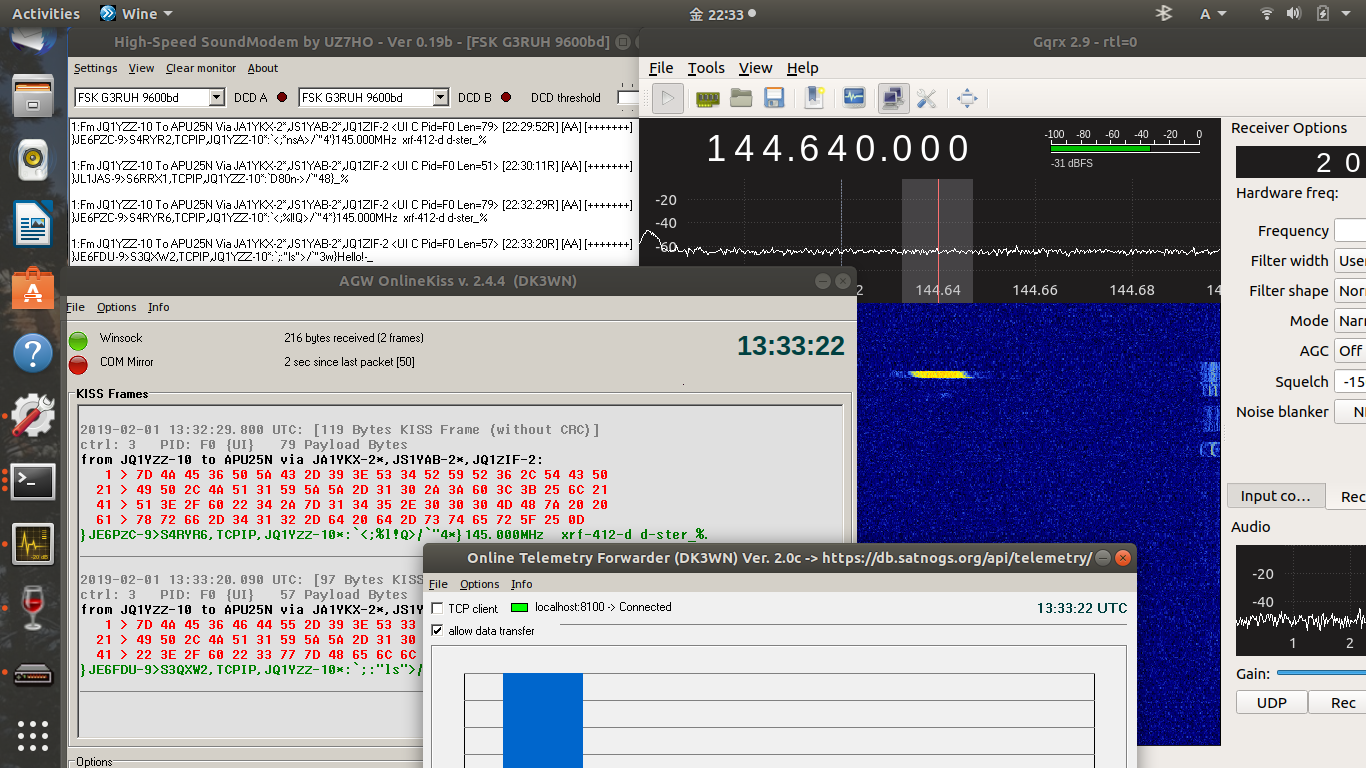
 最後に、周波数自動追尾のために Gpredict をインストールする。
以下の手順での下図右画像の所まで辿り着く。 外国局のサンプル画像を見ると
ここで、Gpredict のダウンリンク周波数が GQRX に反映している様子が伺える。
しかし、自局では GQRX ⇔ Gpredict がうまく連動しない。 以前も同様の症状
であった。下図右画像の赤矢印の部分である。 この問題が、今後の課題である。
> Gpredict の Doppler は時々刻々と変化しているにも関わらず、
> Radio の箇所に連動しない。Settings - Engageボタンを押すと
> 数回は反応し数値が変化するが。さらに、Downlink - Radio の
> 周波数が Gpredict に連動せず変化しない。これが最も重症。
※ ::ffff:127.0.0.1 という設定で解決!
http://wakky.asablo.jp/blog/2019/02/24/9040055
http://www.asahi-net.or.jp/~ei7m-wkt/numb1040.htm
73. Gpredict installing
74. Search in your applications -> Gpredict
75. Gpredict -> Edit -> Preferences -> Ground Stations
76. Gpredict -> Edit -> Update TLE -> From network
77. Gpredict -> File -> New Module -> ISS etc.
78. Set the host and port on Gprecict and GQRX as shown below
79. Gpredict -> Edit -> Preferences -> Interfaces -> Radios -> Add New
80. GQRX -> Tools -> Remote control settings -> host, port etc.
81. Triangle button in the upper right of Gpredict -> Radio Control
82. Set the satellite frequencies, and press Engage & Track button
83. Then it will begin the automatic tracking of Doppler shift
最後に、周波数自動追尾のために Gpredict をインストールする。
以下の手順での下図右画像の所まで辿り着く。 外国局のサンプル画像を見ると
ここで、Gpredict のダウンリンク周波数が GQRX に反映している様子が伺える。
しかし、自局では GQRX ⇔ Gpredict がうまく連動しない。 以前も同様の症状
であった。下図右画像の赤矢印の部分である。 この問題が、今後の課題である。
> Gpredict の Doppler は時々刻々と変化しているにも関わらず、
> Radio の箇所に連動しない。Settings - Engageボタンを押すと
> 数回は反応し数値が変化するが。さらに、Downlink - Radio の
> 周波数が Gpredict に連動せず変化しない。これが最も重症。
※ ::ffff:127.0.0.1 という設定で解決!
http://wakky.asablo.jp/blog/2019/02/24/9040055
http://www.asahi-net.or.jp/~ei7m-wkt/numb1040.htm
73. Gpredict installing
74. Search in your applications -> Gpredict
75. Gpredict -> Edit -> Preferences -> Ground Stations
76. Gpredict -> Edit -> Update TLE -> From network
77. Gpredict -> File -> New Module -> ISS etc.
78. Set the host and port on Gprecict and GQRX as shown below
79. Gpredict -> Edit -> Preferences -> Interfaces -> Radios -> Add New
80. GQRX -> Tools -> Remote control settings -> host, port etc.
81. Triangle button in the upper right of Gpredict -> Radio Control
82. Set the satellite frequencies, and press Engage & Track button
83. Then it will begin the automatic tracking of Doppler shift

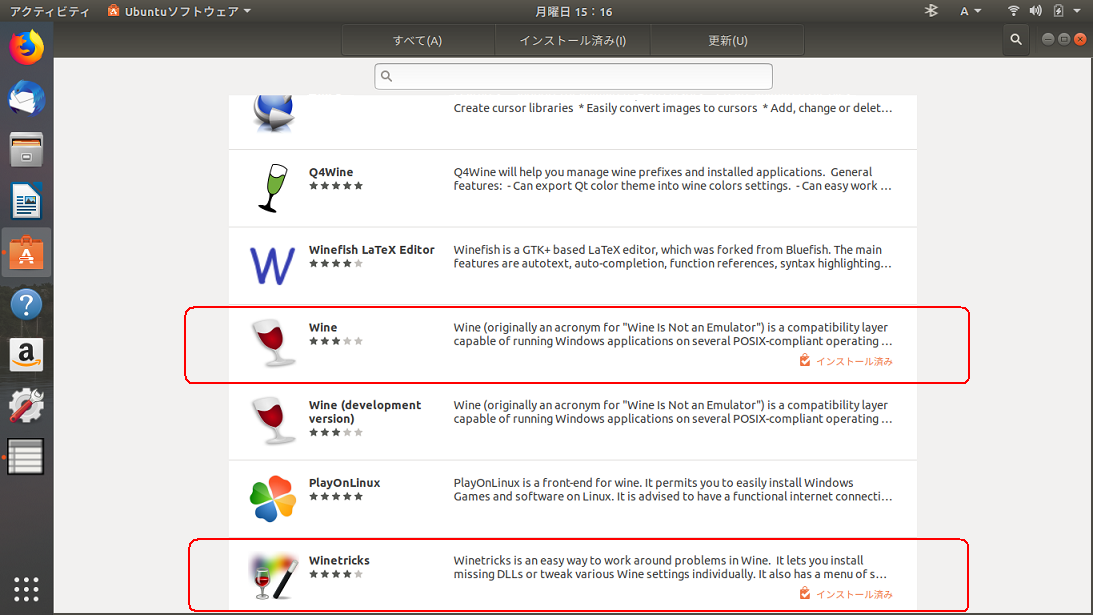
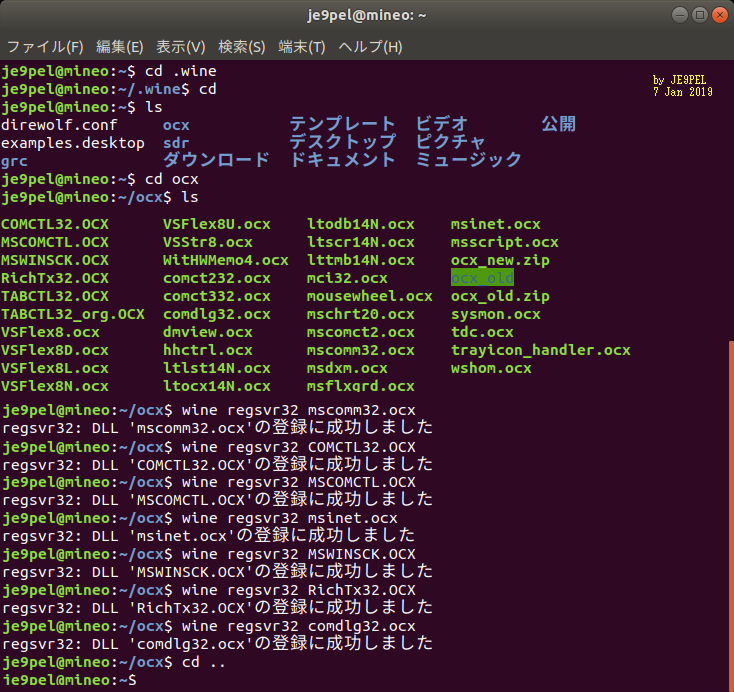
 LINUX Ubuntu上で、Windowsアプリケーション を動作させるための Wine
をインストールした。さらに、衛星ソフトを将来インストールするために
OCXファイル群をこの Wine により LINUX に認識させた。
84. Wine installing
85. Search in your applications -> Wine
86. Make ocx folder in Ubuntu Home
87. Copy all OCX files from Windows folder to there
88. Register some main files using Wine as follows
89. $ cd ocx
90. $ wine regsvr32 mscomm32.ocx
LINUX Ubuntu上で、Windowsアプリケーション を動作させるための Wine
をインストールした。さらに、衛星ソフトを将来インストールするために
OCXファイル群をこの Wine により LINUX に認識させた。
84. Wine installing
85. Search in your applications -> Wine
86. Make ocx folder in Ubuntu Home
87. Copy all OCX files from Windows folder to there
88. Register some main files using Wine as follows
89. $ cd ocx
90. $ wine regsvr32 mscomm32.ocx

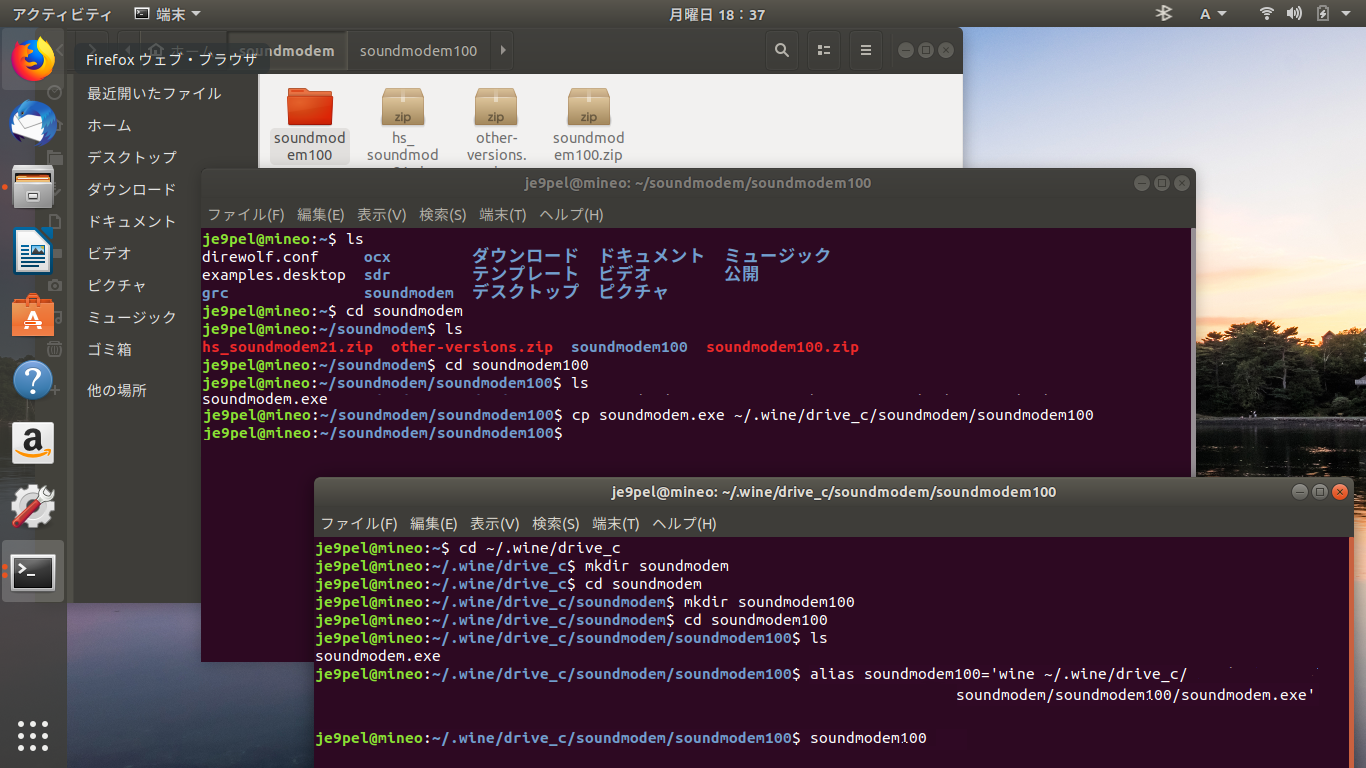
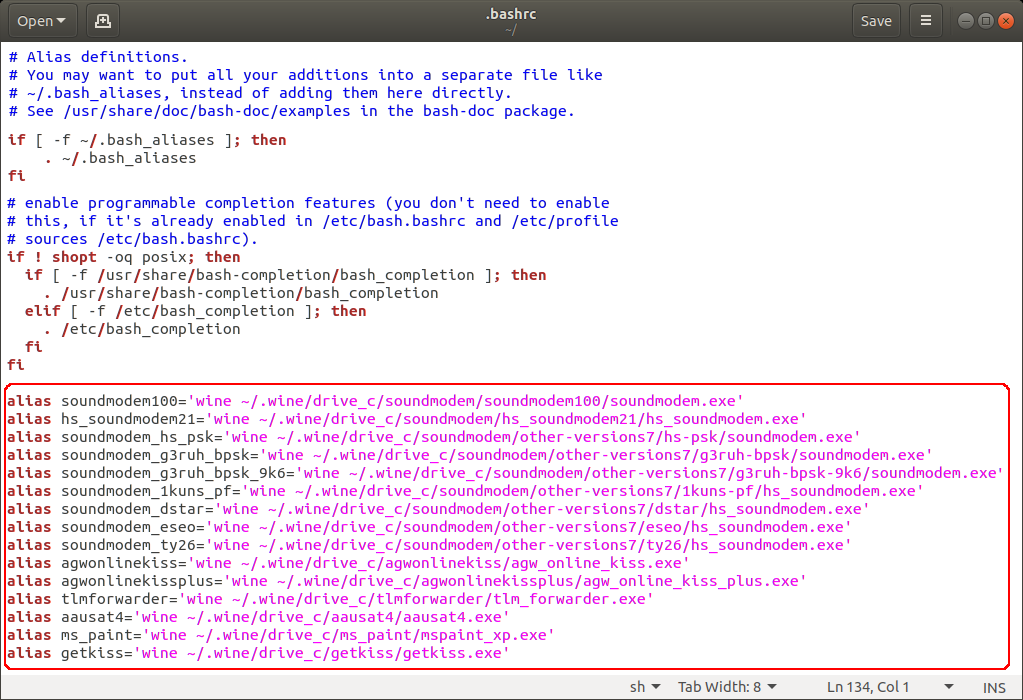
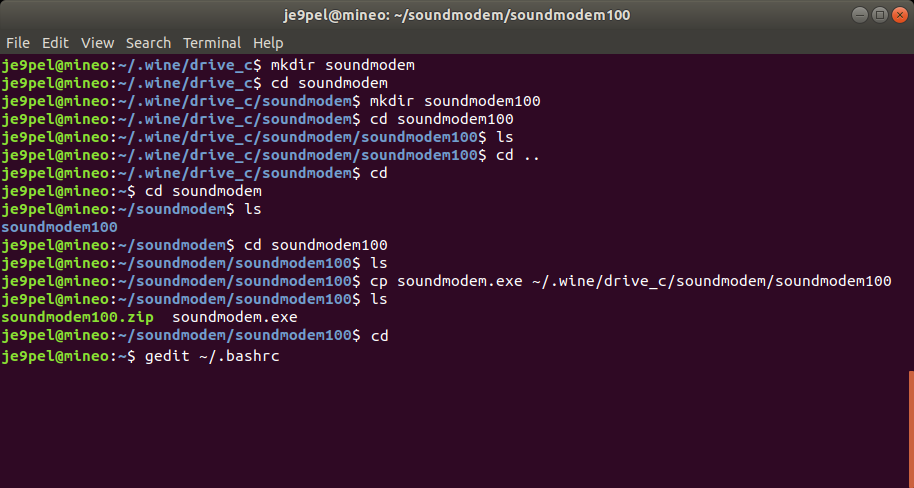
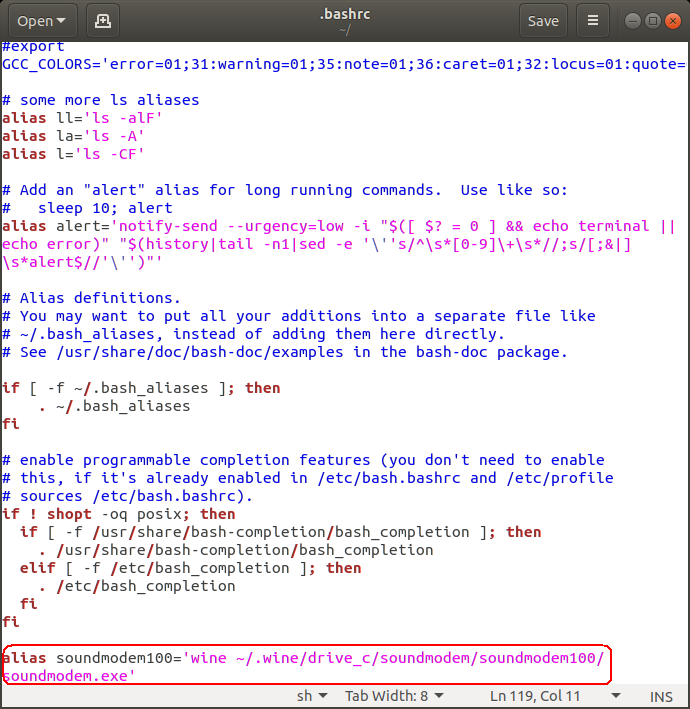
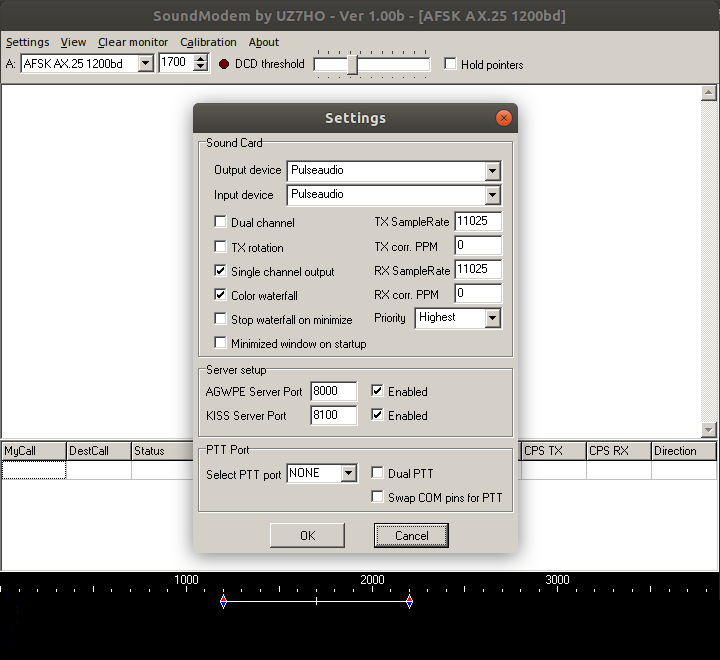
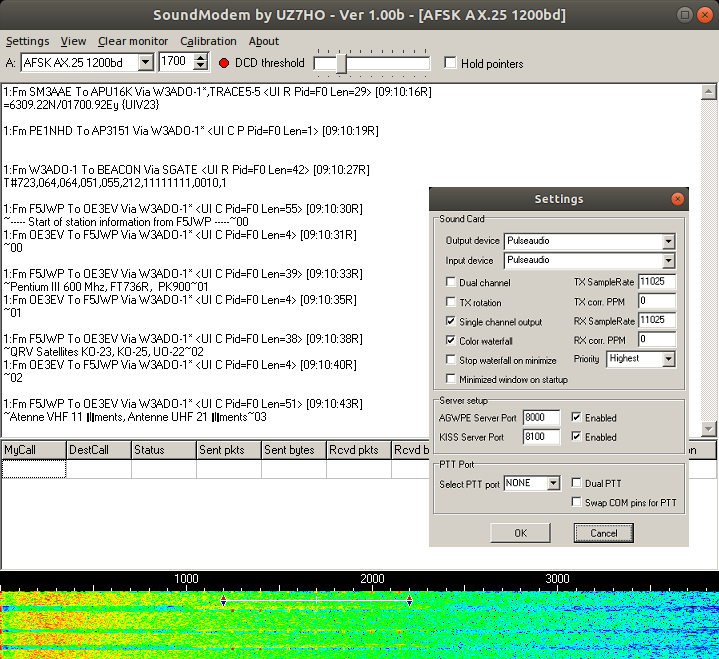
 LINUX Ubuntu上で Soundmodem を起動させることができた!
aliasコマンドを新規に設定することで、Wine により動作させる所が味噌。
後は、□未表示フォントをどうにかしなければならない。なお、設定した
aliasコマンドは、ターミナルを終了すると消えてしまう。永久保存させる
には、98番の alias構文を、geditエディタにより .bashrc の一番下の行
に、100~101番のように書き込む必要がある。
91. Soundmodem using Wine
92. Make soundmodem folder in Ubuntu Home
93. Download Soundmodem100.zip from UZ7HO site
94. Extract soundmodem.exe in this folder
95. Make soundmodem folder as ~/.wine/drive_c/soundmodem/soundmodem100
96. Copy soundmodem.exe to this wine folder
97. Make the new alias command as follows and run "soundmodem100"
98. $ alias soundmodem100='wine ~/.wine/drive_c/soundmodem/soundmodem100/soundmodem.exe'
99. $ gedit ~/.bashrc
100. alias soundmodem100='wine ~/.wine/drive_c/soundmodem/soundmodem100/soundmodem.exe'
101. Then soundmodem.exe can be run after restarting LINUX Ubuntu!
102. $ soundmodem100
LINUX Ubuntu上で Soundmodem を起動させることができた!
aliasコマンドを新規に設定することで、Wine により動作させる所が味噌。
後は、□未表示フォントをどうにかしなければならない。なお、設定した
aliasコマンドは、ターミナルを終了すると消えてしまう。永久保存させる
には、98番の alias構文を、geditエディタにより .bashrc の一番下の行
に、100~101番のように書き込む必要がある。
91. Soundmodem using Wine
92. Make soundmodem folder in Ubuntu Home
93. Download Soundmodem100.zip from UZ7HO site
94. Extract soundmodem.exe in this folder
95. Make soundmodem folder as ~/.wine/drive_c/soundmodem/soundmodem100
96. Copy soundmodem.exe to this wine folder
97. Make the new alias command as follows and run "soundmodem100"
98. $ alias soundmodem100='wine ~/.wine/drive_c/soundmodem/soundmodem100/soundmodem.exe'
99. $ gedit ~/.bashrc
100. alias soundmodem100='wine ~/.wine/drive_c/soundmodem/soundmodem100/soundmodem.exe'
101. Then soundmodem.exe can be run after restarting LINUX Ubuntu!
102. $ soundmodem100

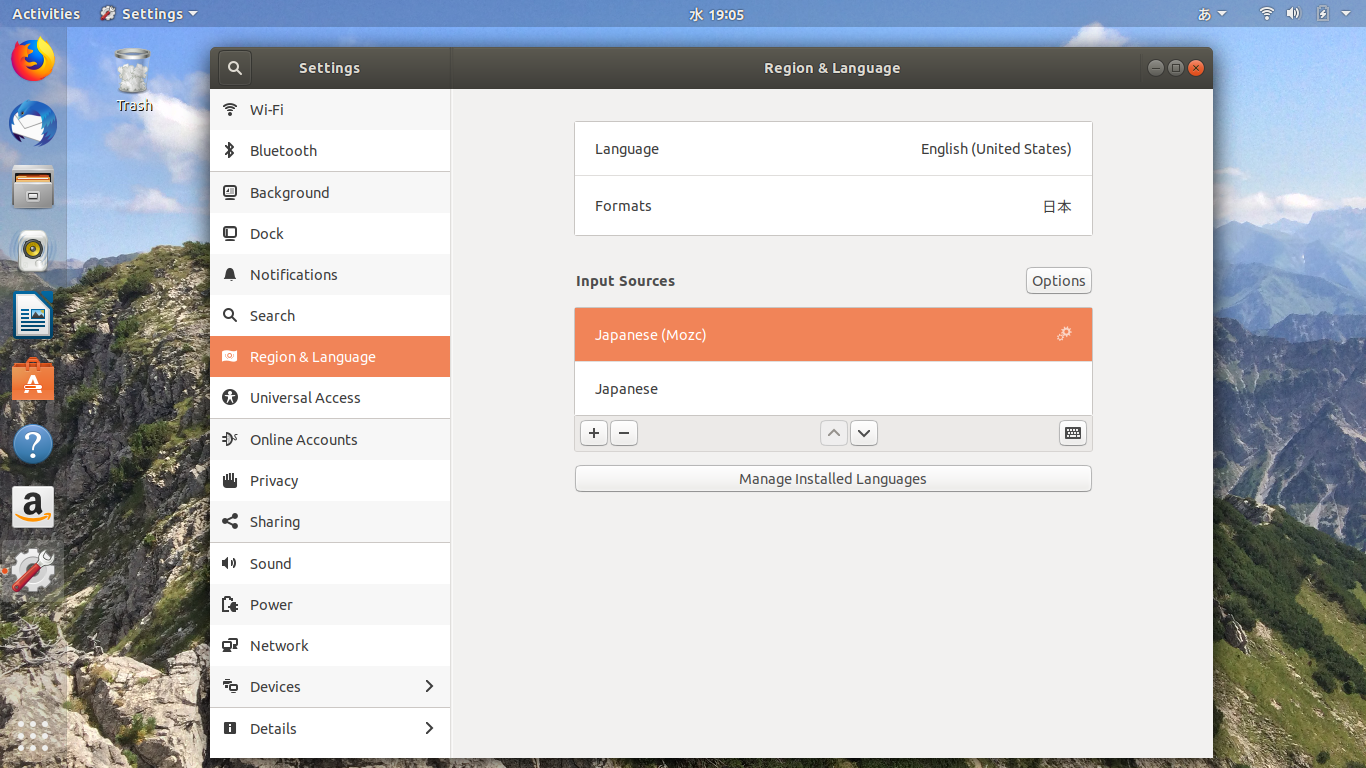
 必要があって言語環境を変更するために何度もフォントアプリケーション
を入れたりしていたら、boot部分が壊れたのか Ubuntu が起動しなくしな
くなってしまった。やむなく、最初に作っておいた Live_USB(USBメモリ)
から、Ubuntu 18.04 を、PC に再インストールした。LINUX USB は楽だ。
今回はトラブルを避けるため、最初から英語環境にてインストールした。
Japanese(Mozc)は後からインストールした。大概の設定は保存されるが、
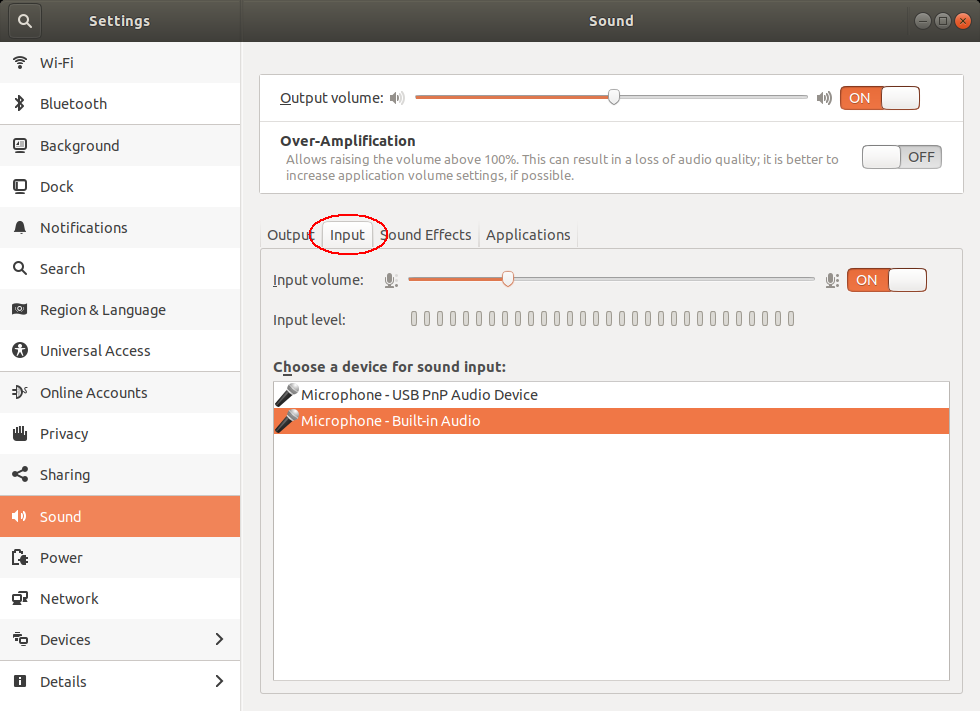
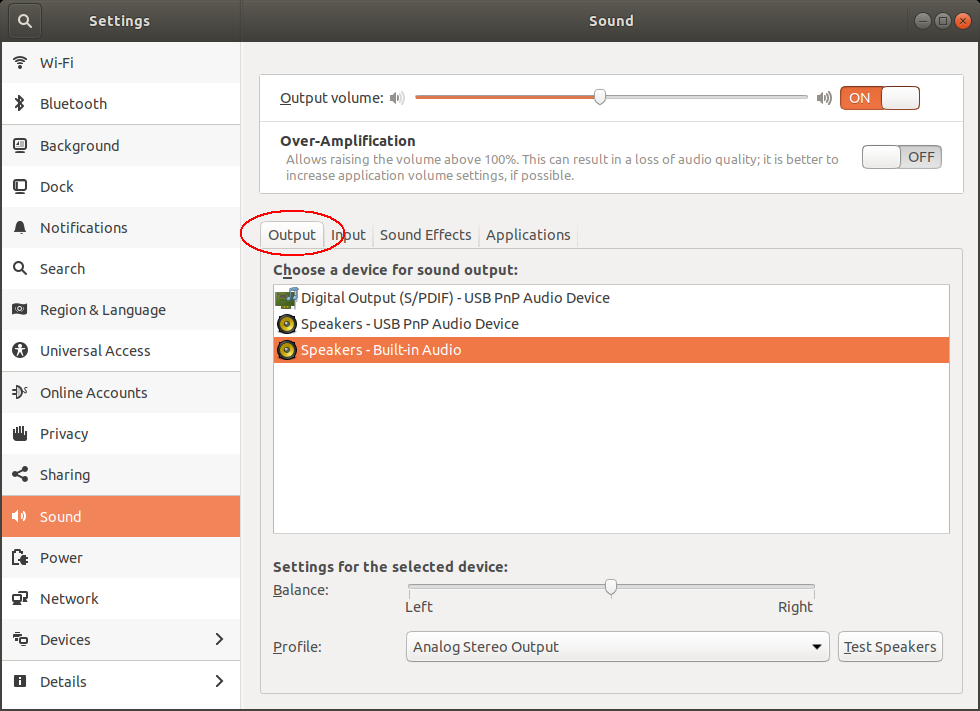
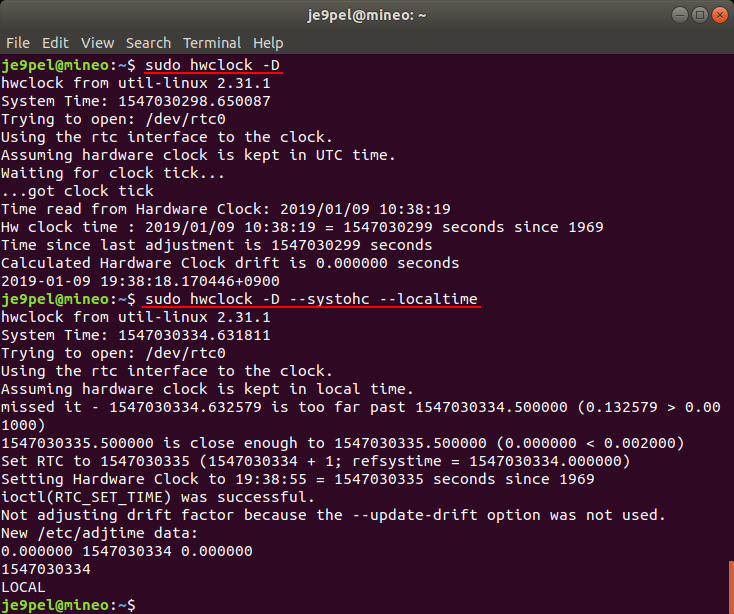
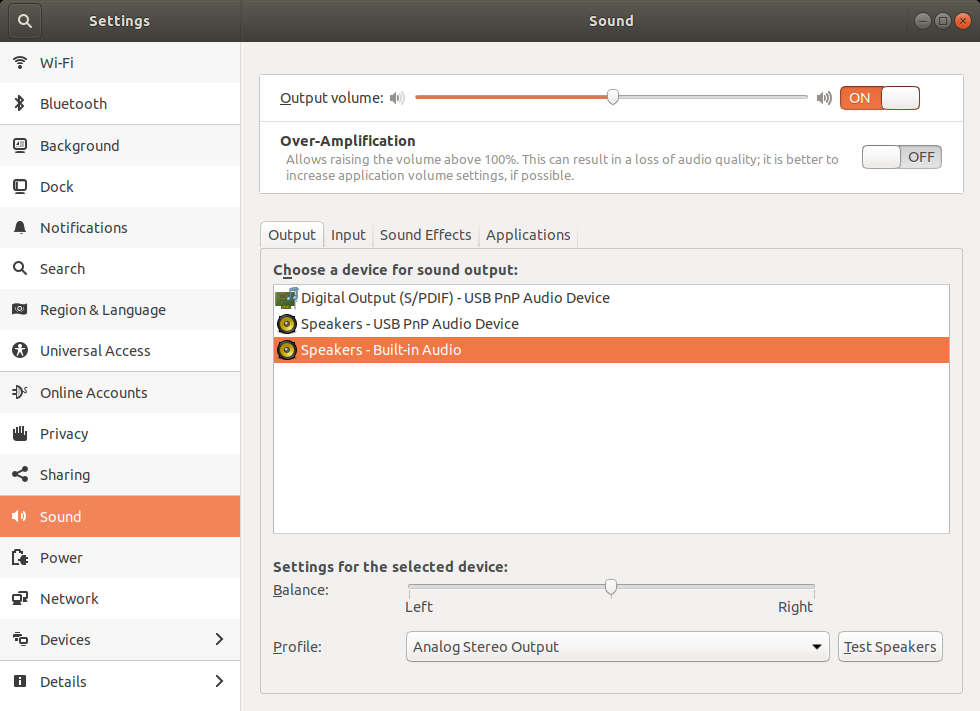
サウンドの出力だけは毎回設定するので面倒だ。現在、Windows と LINUX
を共存させているが、時刻設定が毎回 9時間ずれてしまうので、LINUX の
方で、そうならない設定をターミナルから行った。今日は、RTL-SDR 設定
まで再度行った。ターミナルでのコピペは Windows とキー操作が異なり、
Ctrl+Shift+C, Ctrl+Shift+V で行う。この操作もいったん覚えると楽だ。
103. Re-installing by Live_USB
104. RTL-SDR re-installing by No_21~51
105. $ sudo hwclock -D --systohc --localtime
106. Wine and Soundmodem100 re-installing by No_84~102
Soundmodem100 のフォント問題は解決した。やはり、最初から英語環境に
することが重要だ。Wine と Soundmodem100 を、84~102番 のようにして
再インストールし、alias を設定した後に、Soundmodem100 が正常に英語
表示されることを確認した。将来重要な PulseAudio もインストールした。
必要があって言語環境を変更するために何度もフォントアプリケーション
を入れたりしていたら、boot部分が壊れたのか Ubuntu が起動しなくしな
くなってしまった。やむなく、最初に作っておいた Live_USB(USBメモリ)
から、Ubuntu 18.04 を、PC に再インストールした。LINUX USB は楽だ。
今回はトラブルを避けるため、最初から英語環境にてインストールした。
Japanese(Mozc)は後からインストールした。大概の設定は保存されるが、
サウンドの出力だけは毎回設定するので面倒だ。現在、Windows と LINUX
を共存させているが、時刻設定が毎回 9時間ずれてしまうので、LINUX の
方で、そうならない設定をターミナルから行った。今日は、RTL-SDR 設定
まで再度行った。ターミナルでのコピペは Windows とキー操作が異なり、
Ctrl+Shift+C, Ctrl+Shift+V で行う。この操作もいったん覚えると楽だ。
103. Re-installing by Live_USB
104. RTL-SDR re-installing by No_21~51
105. $ sudo hwclock -D --systohc --localtime
106. Wine and Soundmodem100 re-installing by No_84~102
Soundmodem100 のフォント問題は解決した。やはり、最初から英語環境に
することが重要だ。Wine と Soundmodem100 を、84~102番 のようにして
再インストールし、alias を設定した後に、Soundmodem100 が正常に英語
表示されることを確認した。将来重要な PulseAudio もインストールした。
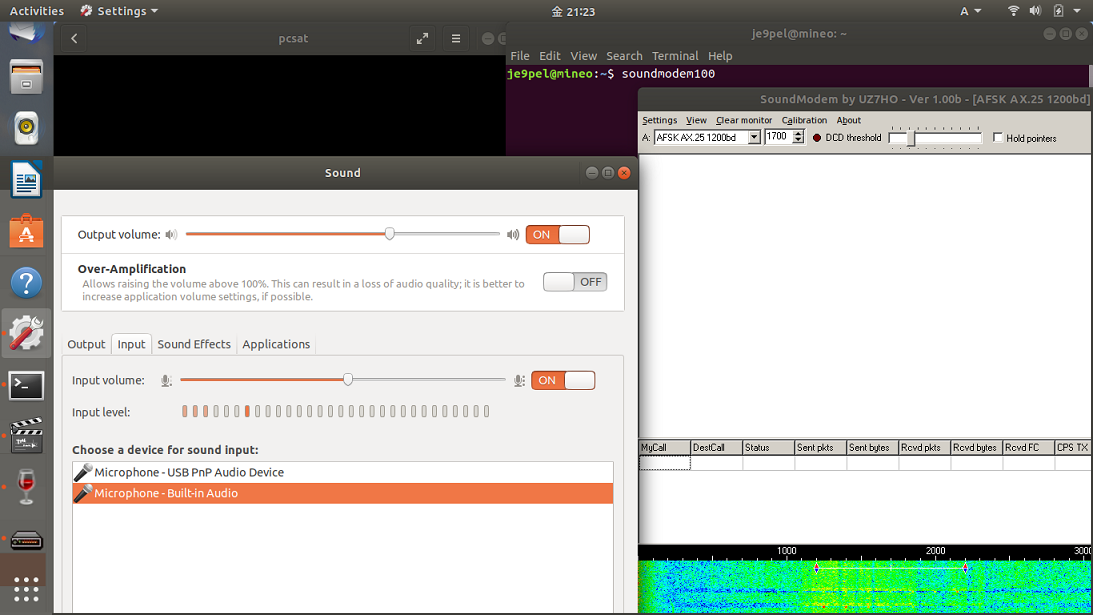
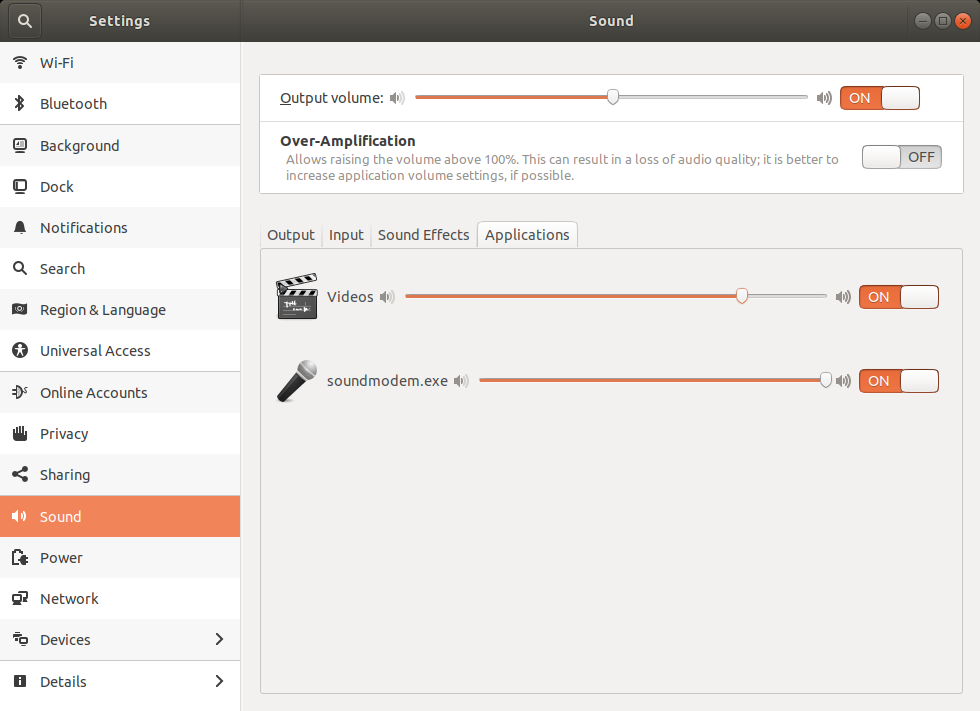
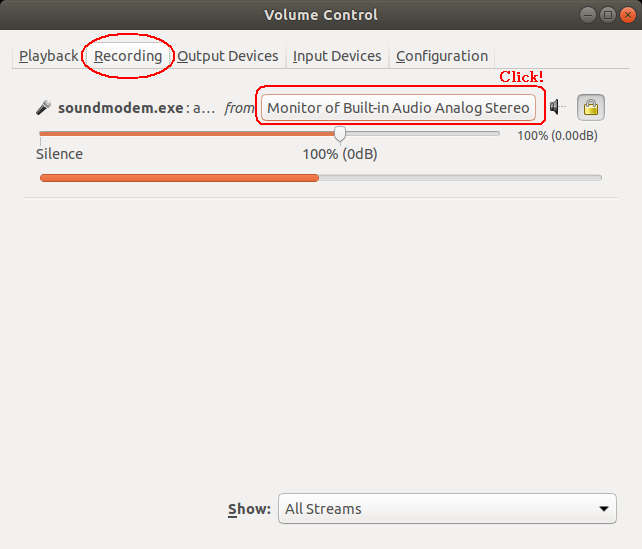
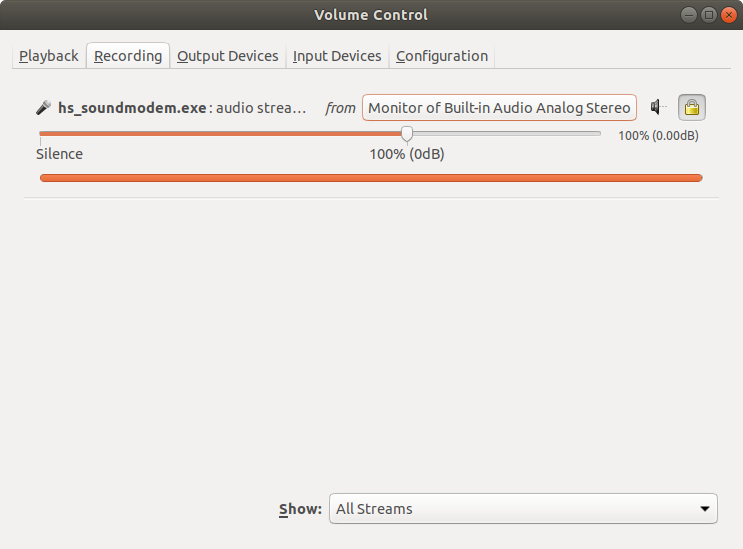
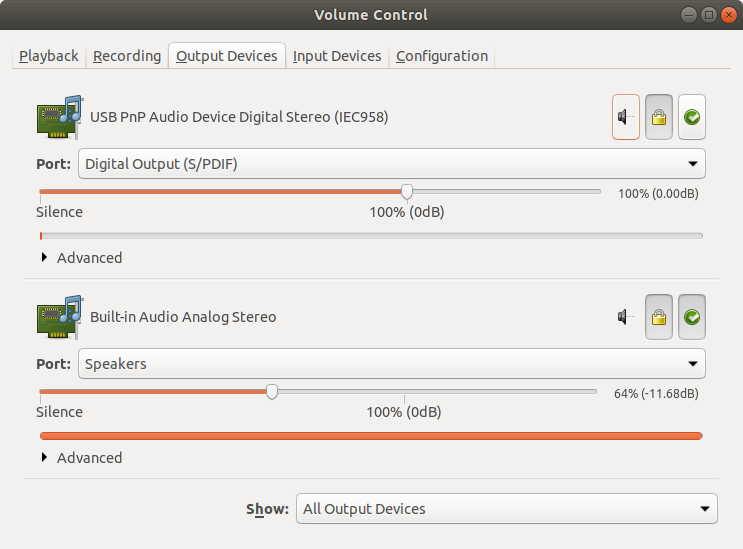
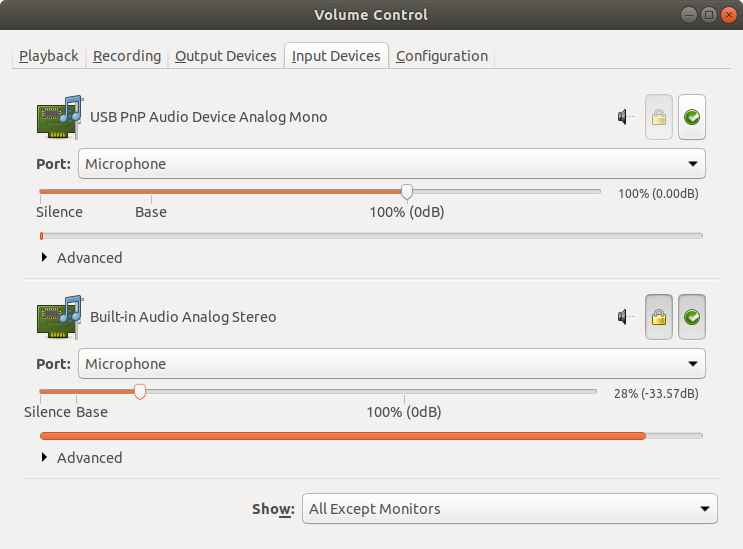
 次の PE0SAT局サイトの下段に、Pulse Audio のアプリ間の音声の連携に
について、今の場合では、Audio ⇔ Soundmodem についてヒントが書かれ
ている。 (pavucontrol = PulseAudio Volume Control) この先、必要に
なる "PulseAudio" を ここでインストールした。それを正しく設定する。
以上で、衛星信号を LINUX上の Soundmodem にデコードすることができる。
107. http://www.pe0sat.vgnet.nl/decoding/unix-tlm-decoding/
> Redirect Audio from one application to another with Pulse
> Audio Volume control. Upon opening pavucontrol, you will
> find a number of tabs, which allow you to set the playback
> and recording device for each application connected to the
> PulseAudio sound server. When you select a recording device
> for an application, you should also see a number of "Monitor"
> devices. These allow you to record from what is normally an
> output device (i.e. your speakers). --- wrote by PE0SAT
108. Confirm to run "Soundmodem100" installing by No.84~106
109. Prepare the sound source "no-44_pcsat.mp3" in DD1US's site
http://www.dd1us.de/historical%20sounds%20from%20space.html
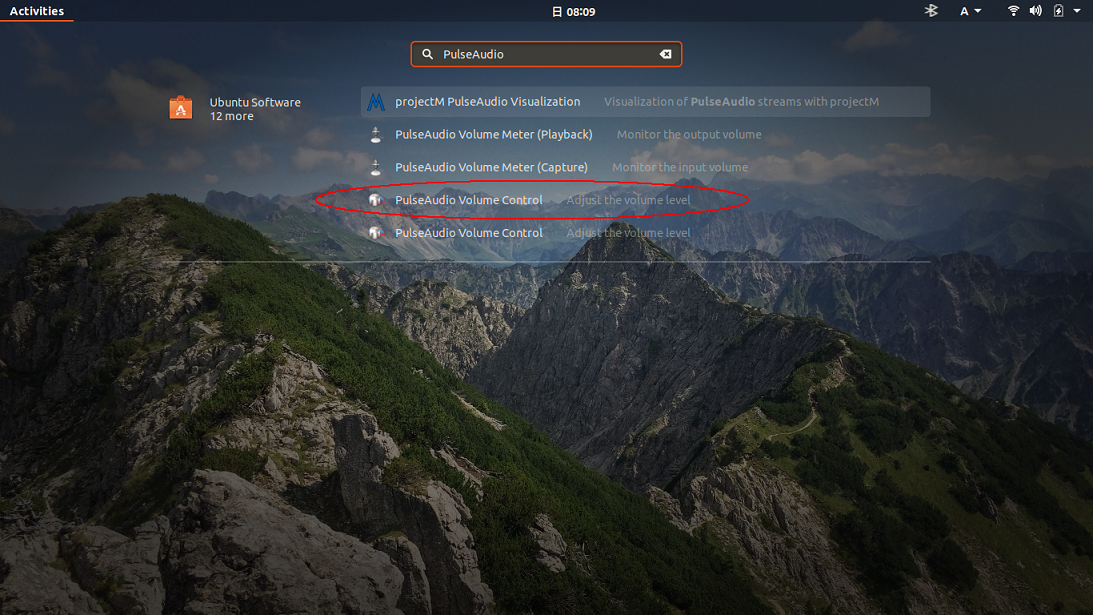
110. Search in your applications -> PulseAudio Volume Control
111. Run "PulseAudio Volume Control" and setup it correctly
112. Then, the satellite audio can be decoded on LINUX_Soundmodem
次の PE0SAT局サイトの下段に、Pulse Audio のアプリ間の音声の連携に
について、今の場合では、Audio ⇔ Soundmodem についてヒントが書かれ
ている。 (pavucontrol = PulseAudio Volume Control) この先、必要に
なる "PulseAudio" を ここでインストールした。それを正しく設定する。
以上で、衛星信号を LINUX上の Soundmodem にデコードすることができる。
107. http://www.pe0sat.vgnet.nl/decoding/unix-tlm-decoding/
> Redirect Audio from one application to another with Pulse
> Audio Volume control. Upon opening pavucontrol, you will
> find a number of tabs, which allow you to set the playback
> and recording device for each application connected to the
> PulseAudio sound server. When you select a recording device
> for an application, you should also see a number of "Monitor"
> devices. These allow you to record from what is normally an
> output device (i.e. your speakers). --- wrote by PE0SAT
108. Confirm to run "Soundmodem100" installing by No.84~106
109. Prepare the sound source "no-44_pcsat.mp3" in DD1US's site
http://www.dd1us.de/historical%20sounds%20from%20space.html
110. Search in your applications -> PulseAudio Volume Control
111. Run "PulseAudio Volume Control" and setup it correctly
112. Then, the satellite audio can be decoded on LINUX_Soundmodem


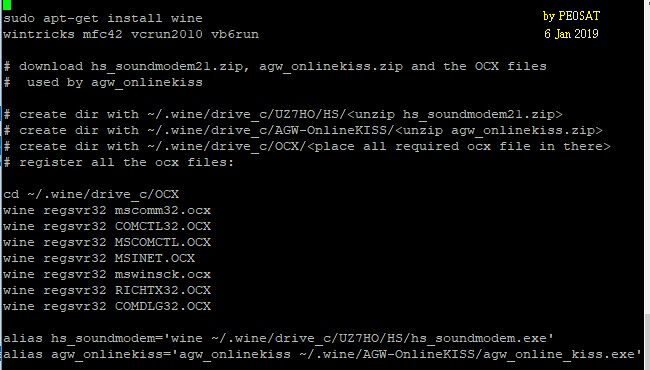
 113. Agw_Online_Kiss installing
114. Copy HS_Soundmodem and Agw_Online_Kiss in the same way No.91~96
115. Install VB_DLL using winetricks for Agw_Online_Kiss as follows
$ winetricks mfc42 vcrun2010 vb6run
116. Add new alias in the same way as No.99~101
117. $ hs_soundmodem19 and $ agwonlinekiss in the two Terminal
113. Agw_Online_Kiss installing
114. Copy HS_Soundmodem and Agw_Online_Kiss in the same way No.91~96
115. Install VB_DLL using winetricks for Agw_Online_Kiss as follows
$ winetricks mfc42 vcrun2010 vb6run
116. Add new alias in the same way as No.99~101
117. $ hs_soundmodem19 and $ agwonlinekiss in the two Terminal

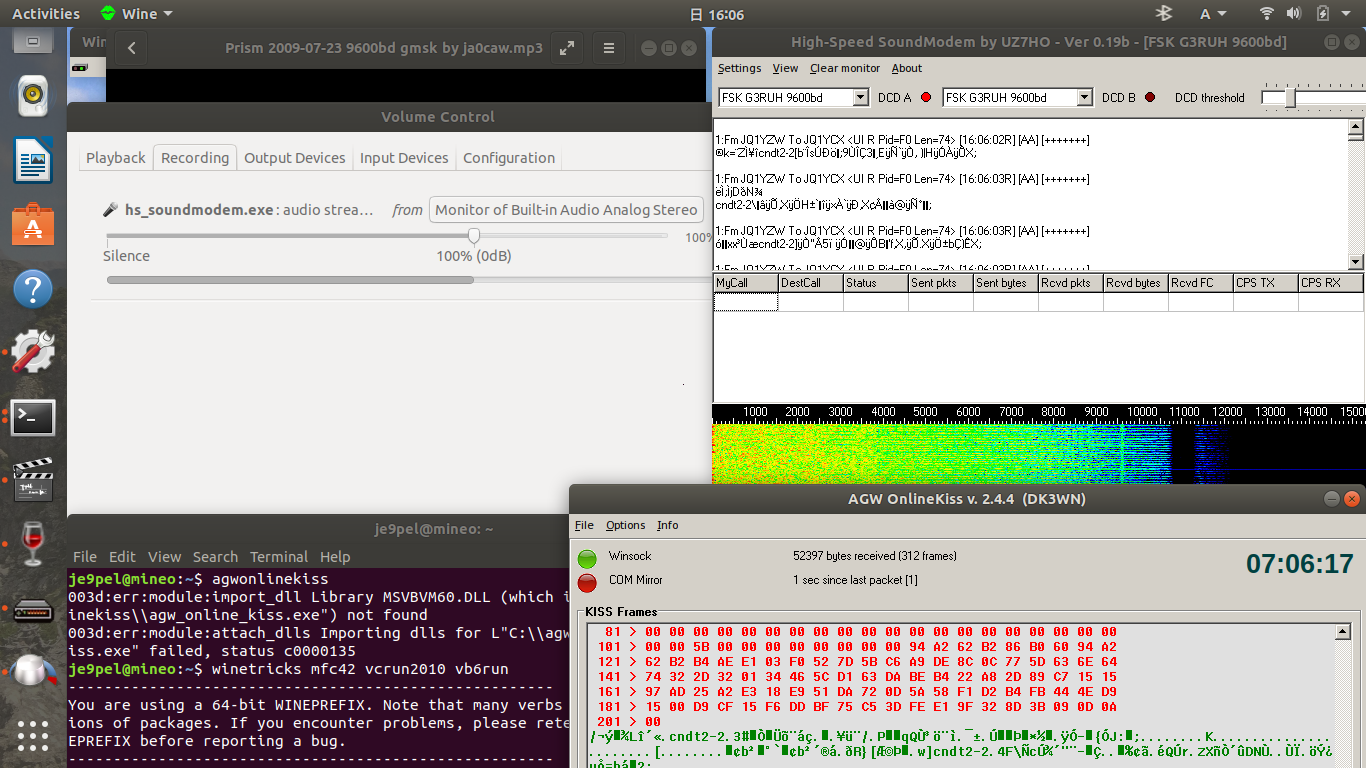
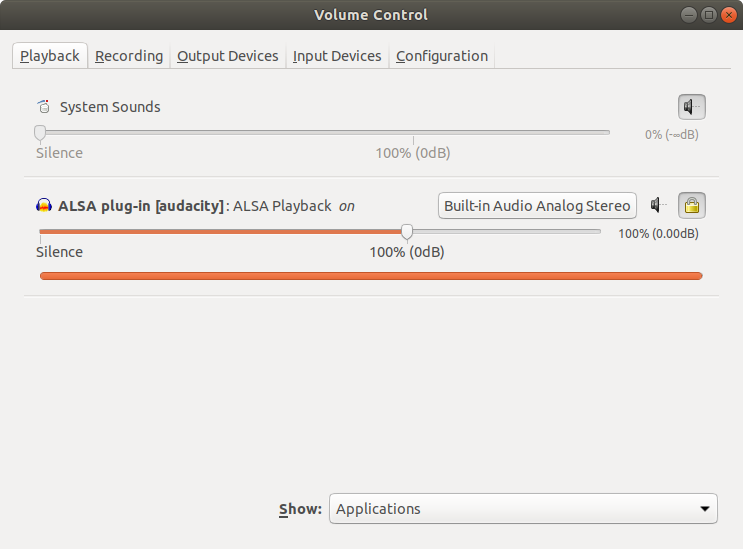
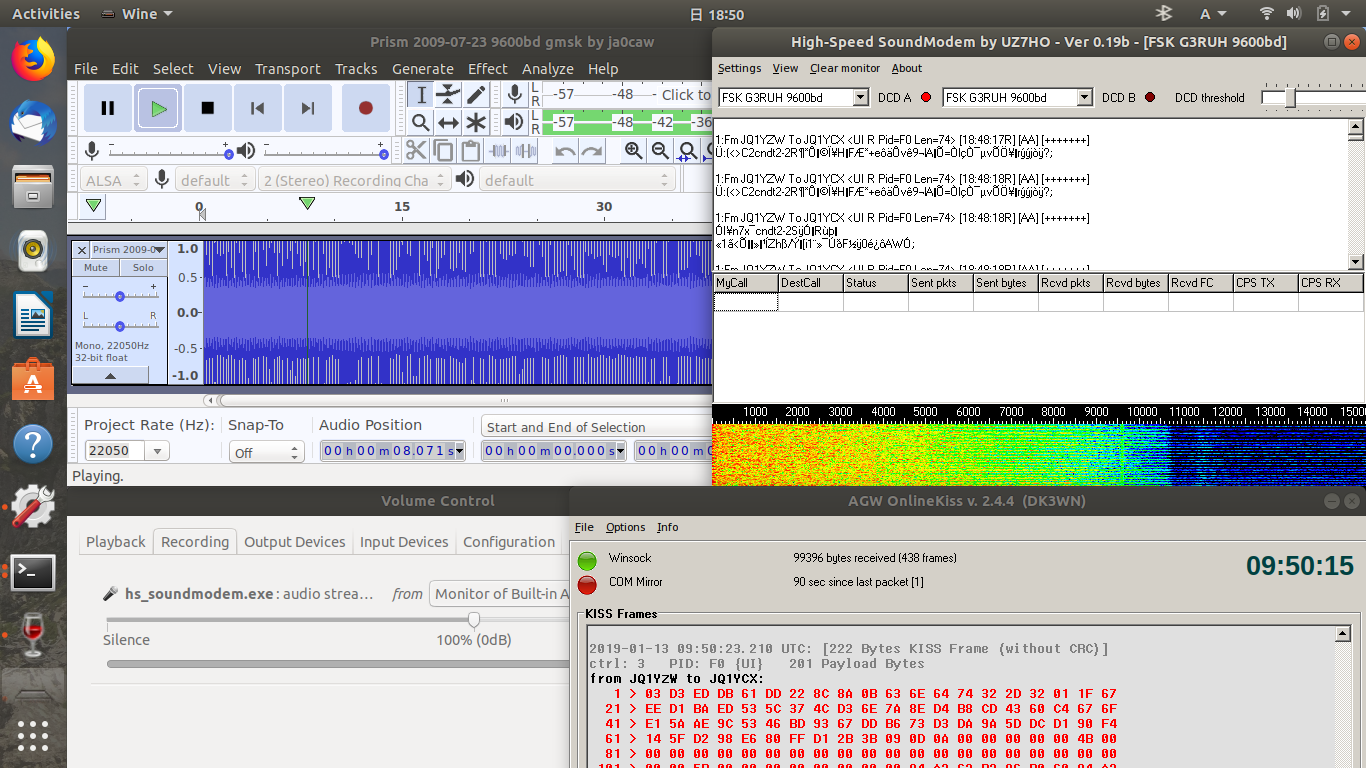
 Audacity もインストールして、衛星信号をデコードしてみた。
音源は、DD1USサイトの "Prism 2009-07-23 9600bd gmsk.mp3" を使用。
LINUX + Wine の使い方も、だいぶ慣れてきた。ところで、No.83 記述
の GQRX ⇔ Gpredict が連携しなかった件は、No.111 の "PulseAudio
_Volume Control" を使えば
Audacity もインストールして、衛星信号をデコードしてみた。
音源は、DD1USサイトの "Prism 2009-07-23 9600bd gmsk.mp3" を使用。
LINUX + Wine の使い方も、だいぶ慣れてきた。ところで、No.83 記述
の GQRX ⇔ Gpredict が連携しなかった件は、No.111 の "PulseAudio
_Volume Control" を使えば解決するのではないかと思う。後日再実験。
118. Audacity installing
119. Run HS_Soundmodem and Agw_Online_Kiss with Audacity
120. Sound source: "Prism 2009-07-23 9600bd gmsk.mp3" in DD1US's site
 Re: SDRSharp on LINUX
From: Jan van Gils
To: Mineo Wakita
Date: Sun, 13 Jan 2019 09:03:16 +0100
Good morning,
It is good the hear that you are successful in using Soundmodem in
combination with wine.
SDR# and wine isn't possible, the only option I know that works is
compiling the orginal sdr# source and run it with the support of
mono on Linux.
http://www.scivision.co/sdr-sharp-ubuntu/
Looking at the source it seems to be very old and I don't know if
a recent version is available.
PE0SAT, Jan van Gils
On 13-01-2019 06:37, Mineo Wakita wrote:
> Thank you very much.
>
> I successfully could decode the satellite audio on LINUX_Soundmodem.
> And I will try to install now HS_Soundmodem and Agw_Online_Kiss.
> http://www.ne.jp/asahi/hamradio/je9pel/90104lnx.htm
>
> By the way, I tried installing SDR# in the same way, but I got
> an error message and it did not run.
>
> If you can run sdr#, please let me know how to do it.
>
> JE9PEL, Mineo Wakita
http://youtu.be/fUjD_j2HK7o
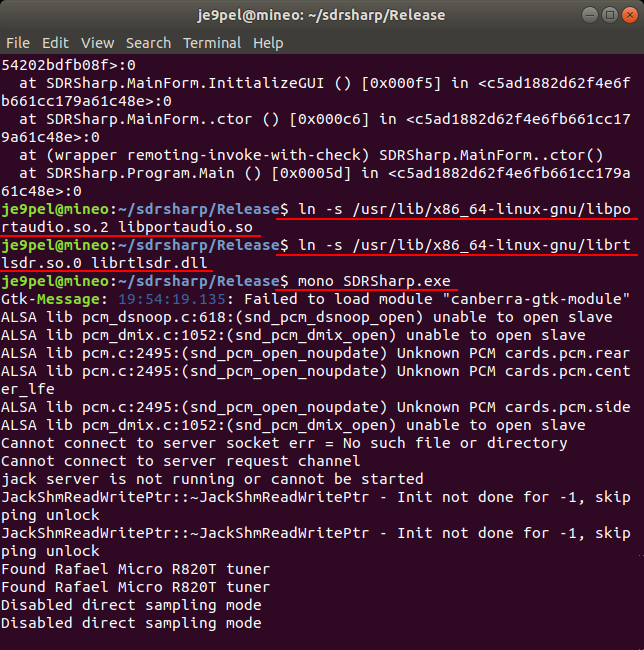
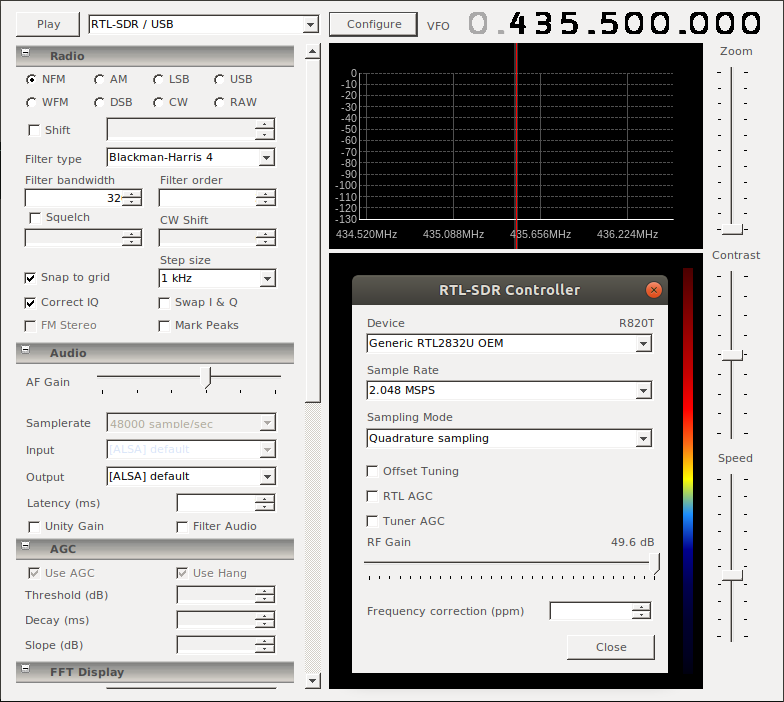
SDR# を、何とか LINUX_Ubuntu上に起動させることができた。
しかし、このままではとても正常に動作するとは思えない…。
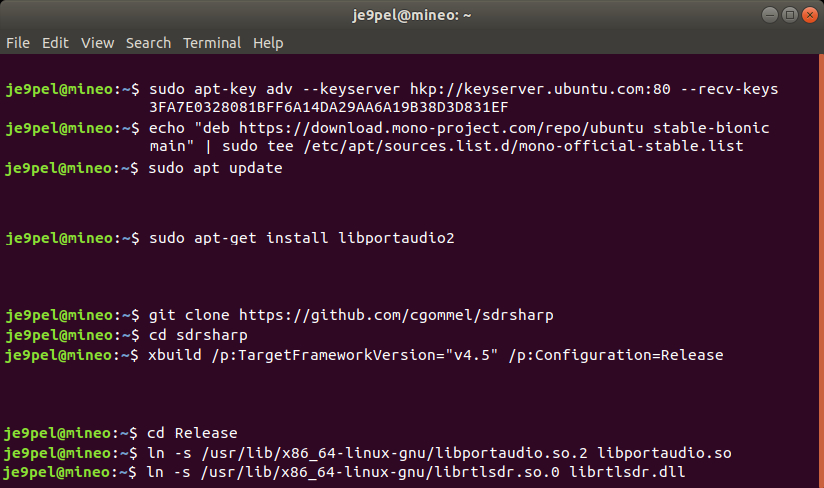
121. Installing Mono for Ubuntu 18.04 (i386, amd64, armhf, arm64, ppc64el)
http://www.mono-project.com/download/stable/
$ sudo apt-key adv --keyserver hkp://keyserver.ubuntu.com:80 --recv-keys 3FA7E0328081BFF6A14DA29AA6A19B38D3D831EF
$ echo "deb https://download.mono-project.com/repo/ubuntu stable-bionic main" | sudo tee /etc/apt/sources.list.d/mono-official-stable.list
$sudo apt update
122. Installing Sound works
http://rtlsdr.org/softwarelinux
$ sudo apt-get install libportaudio2
123. Build SDR#
http://github.com/cgommel/sdrsharp
$ git clone http://github.com/cgommel/sdrsharp
$ cd sdrsharp
$ xbuild /p:TargetFrameworkVersion="v4.5" /p:Configuration=Release
124. Softlinks for Mono executable find Audio libraries
http://www.scivision.co/sdr-sharp-ubuntu/
$ cd Release
$ ln -s /usr/lib/x86_64-linux-gnu/libportaudio.so.2 libportaudio.so
$ ln -s /usr/lib/x86_64-linux-gnu/librtlsdr.so.0 librtlsdr.dll
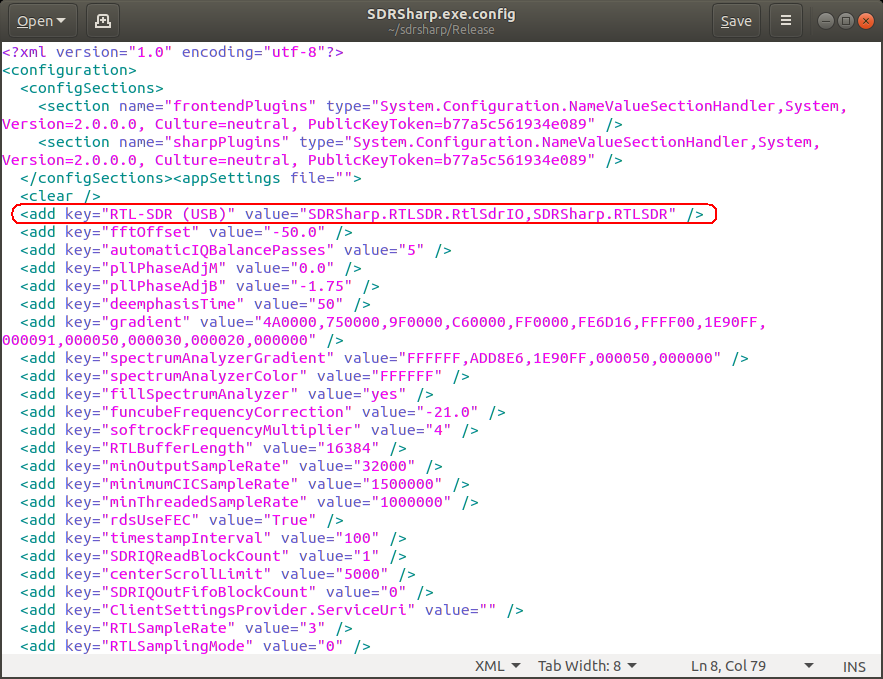
125. Add one line in \Home\sdrsharp\Release\SDRSharp.exe.config
<add key="RTL-SDR (USB)" value="SDRSharp.RTLSDR.RtlSdrIO,SDRSharp.RTLSDR" />
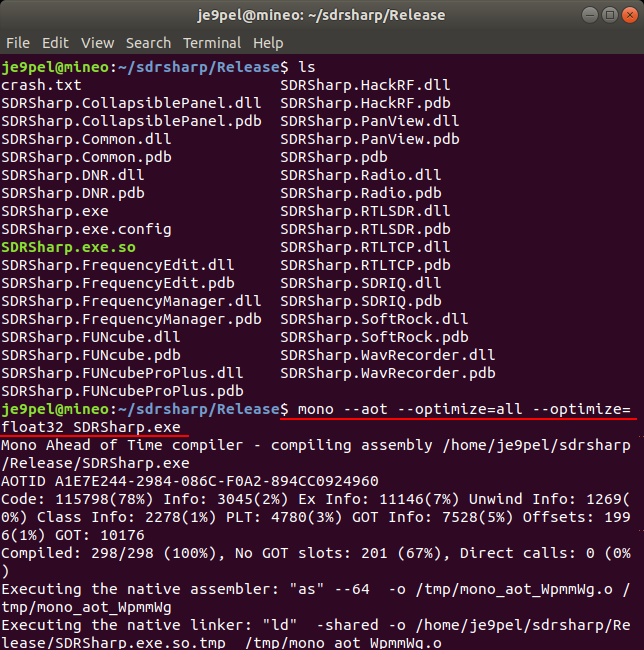
126. Compile it so that it may run a bit faster
$ mono --aot --optimize=all --optimize=float32 SDRSharp.exe
127. Run SDR# using Mono
$ mono SDRSharp.exe
Re: SDRSharp on LINUX
From: Jan van Gils
To: Mineo Wakita
Date: Sun, 13 Jan 2019 09:03:16 +0100
Good morning,
It is good the hear that you are successful in using Soundmodem in
combination with wine.
SDR# and wine isn't possible, the only option I know that works is
compiling the orginal sdr# source and run it with the support of
mono on Linux.
http://www.scivision.co/sdr-sharp-ubuntu/
Looking at the source it seems to be very old and I don't know if
a recent version is available.
PE0SAT, Jan van Gils
On 13-01-2019 06:37, Mineo Wakita wrote:
> Thank you very much.
>
> I successfully could decode the satellite audio on LINUX_Soundmodem.
> And I will try to install now HS_Soundmodem and Agw_Online_Kiss.
> http://www.ne.jp/asahi/hamradio/je9pel/90104lnx.htm
>
> By the way, I tried installing SDR# in the same way, but I got
> an error message and it did not run.
>
> If you can run sdr#, please let me know how to do it.
>
> JE9PEL, Mineo Wakita
http://youtu.be/fUjD_j2HK7o
SDR# を、何とか LINUX_Ubuntu上に起動させることができた。
しかし、このままではとても正常に動作するとは思えない…。
121. Installing Mono for Ubuntu 18.04 (i386, amd64, armhf, arm64, ppc64el)
http://www.mono-project.com/download/stable/
$ sudo apt-key adv --keyserver hkp://keyserver.ubuntu.com:80 --recv-keys 3FA7E0328081BFF6A14DA29AA6A19B38D3D831EF
$ echo "deb https://download.mono-project.com/repo/ubuntu stable-bionic main" | sudo tee /etc/apt/sources.list.d/mono-official-stable.list
$sudo apt update
122. Installing Sound works
http://rtlsdr.org/softwarelinux
$ sudo apt-get install libportaudio2
123. Build SDR#
http://github.com/cgommel/sdrsharp
$ git clone http://github.com/cgommel/sdrsharp
$ cd sdrsharp
$ xbuild /p:TargetFrameworkVersion="v4.5" /p:Configuration=Release
124. Softlinks for Mono executable find Audio libraries
http://www.scivision.co/sdr-sharp-ubuntu/
$ cd Release
$ ln -s /usr/lib/x86_64-linux-gnu/libportaudio.so.2 libportaudio.so
$ ln -s /usr/lib/x86_64-linux-gnu/librtlsdr.so.0 librtlsdr.dll
125. Add one line in \Home\sdrsharp\Release\SDRSharp.exe.config
<add key="RTL-SDR (USB)" value="SDRSharp.RTLSDR.RtlSdrIO,SDRSharp.RTLSDR" />
126. Compile it so that it may run a bit faster
$ mono --aot --optimize=all --optimize=float32 SDRSharp.exe
127. Run SDR# using Mono
$ mono SDRSharp.exe
 編集 18 Jan 2019, JE9PEL/1
補足 SDR++ (plus plus) on LINUX, 11 Nov 2022
Ubuntu 18.04→20.04 upgrade, 11 Jul 2023
編集 18 Jan 2019, JE9PEL/1
補足 SDR++ (plus plus) on LINUX, 11 Nov 2022
Ubuntu 18.04→20.04 upgrade, 11 Jul 2023
 トップ へ戻る.
 LINUX #1 へ戻る.
 ホームページ(目次) へ戻る.