LINUX USB 起動方法 #1

● (No.916) LINUX USB 起動方法 #1 (2016年7月7日) ---------------------------------------------- LINUX Ubuntu の USB インストールにやっと成功し、USB から Ubuntu を起動し インターネット接続することができた。ここまでに難題頻出。備忘録として記す。 Windows 10上の Ubuntu 18.04 については、LINUX USB 起動方法 #2 を参照。
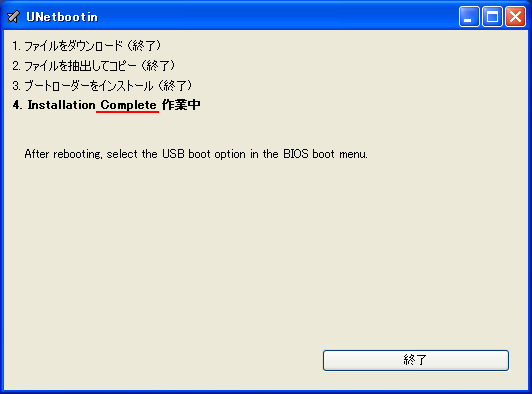
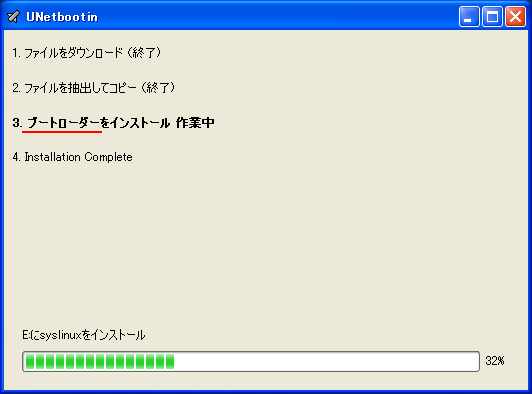


1. まず、[LINUX初心者入門講座] を熟読。 2. 特に、[Linux を USBメモリにインストールする方法] のページを参考。 3. インストーラ [UnetBootin] をダウンロードして、Ubuntu 16.04 を試みる。 4. しかし、途中で [PAE Unable to boot. Use a kernel appropriate for ...] 5. というメッセージが出て、インストールができない。(PAE: 物理メモリ拡張) 6. つまり、自局のXP機は古すぎて、Ubuntu Ver16.04 が対応していないらしい。 7. 某所から Ver 9.04 ISOファイルをダウンロード。 やっとインストール完了。 8. (その後、Win_7機に Ubuntu 16.04 をインストールして LINUX実験継続中) 9. Windows が起動する前に、BIOS の [SETUP] の画面を表示させる。(F2キー) 10. BOOT の起動設定に USB の項目がない! しかし、USBメモリを挿した状態で 11. [Ctrl + Enter] キーとすると、すべての起動BIOSが見えたので、Spaceキー 12. を押して、USB の起動順位を、HDD より上の位置に持っていくことができた。 13. やっと LINUX Ubuntu の USB起動に成功した。スクリーンショットもできた。 14. しかし、キーボード配列が US(101) で、漢字や @ などの記号が打てない。 15. Ubuntu -> システム -> 設定 -> [キーボード], [SCIM入力メソッドの設定] 16. などで日本語設定しても 106配列にならない。せっかく設定しても、 17. 無線LAN設定なども全て、次の起動時には白紙に戻ってしまう。(解決済み) 18. Ver 11.10 [ubuntu-ja-11.10-desktop-i386.iso 2011-10-16 00:33 691M] 19. でも起動できた。最初の起動画面に多数のアプリケーションアイコンがある。 20. 右上の小さい扇形が 無線LANに接続するボタンで、[More networks] から 21. 自局の無線LANをクリックしパスワードを入力すると、扇形が電波型になる。 22. [Mozilla Firefox] のアイコンをクリックするとインターネット閲覧できる。 23. キーボードの入力配列の問題はまだ未解決。漢字や記号がまだ入力できない。 24. 起動画面の左下の [歯車(System Settings)] や [+]ボタンから日本語入力 25. の設定ができるが、カナ入力になるだけで問題の解決には至っていない。 26. Ubuntu を次回起動すると、設定も全て白紙に戻ってしまう。(解決済み) 27. Windows 7 Boot起動順位の変更方法 28. コントロールパネル -> システムとセキュリティ -> システム 29. -> システムの詳細設定 -> システムのプロパティ -> 詳細設定 30. -> 起動と回復 -> 設定 -> 起動システム -> USB選択 -> 再起動 31. あるいは この方法の他に、Windows 7 が起動する直前に -> Enter 32. -> BIOSセットアップ -> 起動 ->起動デバイスの優先順位 -> Enter 33. -> Spaceキーで上下に移動 -> もし、[除外された起動デバイス] 34. -> にいるならば、矢印キーでそれを選択し、[x]キーを押すと、 35. -> [起動デバイスリスト] に入る -> 先頭に USB を移動する。 36. Windows 8.1 Boot起動順位の変更方法 37. チャーム -> 設定 -> PC設定の変更 -> [保守と管理] -> [回復] 38. -> [PCの起動をカスタマイズする] -> [今すぐ再起動する] 39. -> [オプションの選択] -> [トラブルシューティング] 40. -> [詳細のオプション] -> [UEFIファームウェアの設定] 41. -> [再起動] -> [USBメモリ挿入] -> [Boot] 42. -> USB の起動順位を #1 に変更 -> [Enter] -> 再起動 43. http://it.english-and-paso.com/soft/kaihuku-drive-youryou/ 44. http://it.english-and-paso.com/soft/kaihuku-drive-kakunin/ 45. http://it.english-and-paso.com/soft/kaihuku-usb-kakunin/ 46. 設定変更を保存する方法 47. データ保存領域(casper-rw) を作成する。簡単には、最初に UNetbootin で 48. ISOファイルをインストールする時に、下段の 「スペースは、リブートしても 49. ファイルを維持するために使用(Ubuntuのみ):」 の箇所で、[3072MB] とする。 50. Ubuntu 16.04 無線LAN接続 51. System Settings [歯車] -> Hardware - Network -> Wireless から自局選択 52. パスワード入力 -> 画面右上の扇形クリック → パスワード再入力 53. 画面右上の扇形 -> 電波型になり接続完了 54. Ubuntu 16.04 キーボード日本語入力[US/JIS] の変更方法 (using Mozc) 55. http://www.orca.med.or.jp/receipt/download/precise/mozc.html 56. http://qiita.com/AnchorBlues/items/beeb40593fd4c579dbe5 57. System Settings [歯車] -> Personal -> Language Support -> Install 58. -> Keyboard input method System: fcitx を選択 59. System Settings [歯車] -> Personal -> Text Entry 60. -> [+]ボタン -> Japanese -> Add 61 -> [^]ボタンで Japanese を一番上に移動 62. Ubuntu画面右上 En表示をクリックして Ja表示に変更 -> USB で再起動 63. Ubuntu画面右上 キーボードマークをクリック -> Keyboard-Japanese を確認 64. Ubuntu画面左上 Search your computer [検索]欄に Fcitx と入力 65. -> Fcitx Configuration をクリック -> [^]ボタンで Japanese を上方に移動 66. -> [+]ボタンで Mozc を追加 -> [^]ボタンで Mozc を一番上に移動 67. 以上で日本語入力ができる。キーボード上 [半角/全角]キーで切り替える。 68. 無操作でも画面を閉じない設定 69. System Settings [歯車] -> Personal 70. -> Brightness & Lock -> Turn screen of when inactive for: never 71. アイコンを PC画面下部に配置 72. Search your computer [検索] -> Terminal [端末] 73. $ gsettings set com.canonical.Unity.Launcher launcher-position Bottom 74. 時刻設定を東京(JST)に変更 75. $ timedatectl set-timezone Asia/Tokyo 76. $ timedatectl 77. $ sudo timedatectl set-local-rtc true 78. トラブル発生中に覚えた操作 79. [Ctrl+Alt+T] キーで、Terminal を起動できる。 80. アプリがフリーズしたら、Ctrl+Alt+F2 -> $ sudo pkill xxxxx -> Ctrl+Alt+F7 81. $ sudo shutdown -h now で、PC をシャットダウンできる。 82. sudo apt-get --purge remove (パッケージ) で、完全削除。 83. ubuntu-16.04.1-desktop-i386.iso を、Windowsフォルダにバックアップ。 84. How to install Applications in Ubuntu 16.04 85. http://note.kurodigi.com/post-0-15/ 86. http://qiita.com/okayama_fumi/items/8c3518d2006ea714fed5 87. http://sicklylife.at-ninja.jp/memo/ubuntu1604/settings.html 88. AzPainter installing 89. http://azsky2.html.xdomain.jp/linux/azpainter/ 90. Download and Extract [azpainter-1.0.7.tar.bz2] -> Search your computer -> Terminal 91. $ sudo apt-get install g++ make libX11-dev libXext-dev libXft-dev libXi-dev libjpeg-dev 92. $ sudo -s 93. # sudo apt-get install build-essential libgtk2.0-dev 94. # sudo apt-get install libjpeg-dev 95. Ubuntu -> Downloads -> [azpainter-1.0.7.tar.bz2] right_click -> Open with Archive Maneger -> Extract 96. Ubuntu -> Downloads -> [azpainter-1.0.7] right_click -> Open in Terminal 97. ~/Downloads/azpainter-1.0.7$ sudo make 98. ~/Downloads/azpainter-1.0.7$ sudo make install 99. Successfully Install 100. Search your computer -> AzPainter -> Click! 101. Rassam-paint installing 102. http://osdn.jp/projects/sfnet_rassampaint/ 103. Download [rassam-paint_1.1_32bit.tar.gz] 104. Ubuntu -> Downloads -> [rassam-paint_1.1_32bit.tar.gz] right_click -> Open with Archive Maneger -> Extract 105. Ubuntu -> Downloads -> [rassam-paint] -> Run! 106. gFTP installing 107. http://gftp.seul.org 108. Download [gftp-2.0.19.tar.gz] 109. Ubuntu -> Downloads -> [gftp-2.0.19.tar.gz] right_click -> Open with Archive Maneger -> Extract 110. Ubuntu -> Downloads -> [gftp-2.0.19] right_click -> Open in Terminal 111. ~/Downloads/gftp-2.0.19$ ./configure 112. ~/Downloads/gftp-2.0.19$ sudo make 113. ~/Downloads/gftp-2.0.19$ sudo make install 114. Search your computer -> gFTP -> Click! 115. Input Host:netftp.asahi-net..., Port: 21 and User:..., etc. 116. Avast installing 117. http://avast-linux-home-edition.jp.uptodown.com/ubuntu 118. Download [avast Linux Home Edition] 119. Ubuntu -> Downloads -> [avast-linux-home-edition-1.3.0.deb] right_click 120. -> Open With Software Install -> [avast4workstaion] 121. -> Install -> [Search your computer] -> Input [avast] 122. -> [avasr! Antivirus] -> Double Click -> [Registration] 123. -> [Click here to obtain license key] or 124. -> Register avast! Free Antivirus and Avast installed. 125. -> Enter the licence key obtained from a mail in the text field of [Registration] 126. Cairo-clock installing 127. http://launchpad.net/ubuntu/+source/cairo-clock 128. Click top [0.3.4-2ubuntu2] 129. Download [cairo-clock_0.3.4.orig.tar.gz] 130. Ubuntu -> Downloads -> [cairo-clock_0.3.4.orig.tar.gz] right_click -> Open With Archive Manager -> Extract 131. Ubuntu -> Downloads -> [cairo-clock_0.3.4] right_click -> Open in Terminal 132. ~Downloads/cairo-crock-0.3.4$ ./configure 133. 'No Package libgrade-2.0 found' etc. 134. Error message and stop install. So, proceed to the next step. 135. http://www.takeposo.sakura.ne.jp/unix/setting/pkg_config.html 136. Download [pkg-config-0.29.1.tar.gz] 137. Ubuntu -> Downloads -> [pkg-config-0.29.tar.gz] right_click -> Open With Archive Maneger -> Extract 138. Ubuntu -> Downloads -> [pkg-config-0.29.1] right_click -> Open in Terminal 139. ~Downloads/cairo-crock-0.3.4$ ./configure 140. 'No Package glib-2.0 found' etc. 141. Error message and stop again install. 142. $ sudo apt-get install libperl-dev libgtk2.0-dev 143. $ sudo dpkg --configure -a 144. ~Downloads/cairo-crock-0.3.4$ ./configure 145. Error message and stop again install. 146. http://pkgs.org/download/cairo-clock 147. http://pkgs.org/ubuntu-16.04/ubuntu-universe-i386/cairo-clock_0.3.4-2ubuntu2_i386.deb.html 148. Download [cairo-clock_0.3.4-2ubuntu2_i386.deb] in this site. 149. $ sudo dpkg -i cairo-clock_0.3.4-2ubuntu2_i386.deb 150. I can't launch yet this cairo-clock package even if I do any experiment. 151. $ sudo apt-get -f install 152. ~Downloads/cairo-clock-0.3.4$ ./configure 153. Finally I could launch this cairo-clock package at 30 Jun 2016. 154. Search your computer -> start -> Startup Applications -> Add -> cairo-clock -> but Size Error 155. Search your computer -> MacSlow's cairo-clock -> Click! 156. GNURadio installing (failed) 157. http://gnuradio.org/ 158. Download [gnuradio-3.7.9.2.tar.gz] 159. Ubuntu -> Downloads -> [gnuradio-3.7.9.2.tar.gz] right_click -> Open -> Extract 160. Ubuntu -> Downloads -> [gnuradio-3.7.9.2] right_click -> Open -> Readme 161. Ubuntu -> Downloads -> [gnuradio-3.7.9.2] right_click -> Open in Terminal 162. ~Downloads/gnuradio-3.7.9.2$ mkdir build 163. ~Downloads/gnuradio-3.7.9.2$ cd build 164. ~Downloads/gnuradio-3.7.9.2/build$ sudo apt install cmake 165. ~Downloads/gnuradio-3.7.9.2/build$ cmake ../ 166. No package: Cppunit, Git, Cheetah etc. 167. ~Downloads/gnuradio-3.7.9.2/build$ sudo apt install git, etc. 168. Configuring incomplete, errors occurred! 169. Mozc Fatal Error! 170. $ sudo rm /var/crash/* 171. Because I am having trouble, I will try to install GNUradio again. 172. http://ecee.colorado.edu/~mathys/ecen4652/SDRsoftware/GNURadioInstall.html 173. [Ctrl+ALT+T] key -> Terminal 174. $ wget http://www.sbrac.org/files/build-gnuradio && chmod a+x ./build-gnuradio && ./build-gnuradio 175. You need to stay nearby during the installation process, wait approximately one hour. 176. $ gedit ~/.bashrc 177. Add the following two lines at the bottom in the popup window, and Save. 178. > # Added for GNU Radio applications and for GNU Radio Companion (GRC) 179. > export PYTHONPATH=/usr/local/lib/python2.7/dist-packages 180. Type 'gnuradio-companion' in a command-line terminal. 181. But the following error message appeared, so I tried to install GNURadio again. 182. GNURadio installing (solved) 183. You will have to enable the component called 'universe'. 184. $ sudo add-apt-repository universe 185. $ sudo apt-get update 186. $ sudo apt install gnuradio 187. $ gnuradio-companion 188. GNURadio 3.7.9 Launch Successfully! 189. GNURadio + RTL-SDR(RTL2832U) studying 190. http://www.dk3wn.info/p/?p=71903 191. http://www.dk3wn.info/p/?p=71925 192. http://www.dk3wn.info/p/?p=72493 193. http://www.dk3wn.info/p/?p=72647 194. http://www.dk3wn.info/p/?p=72980 195. http://www.dk3wn.info/p/?p=72986 196. http://www.dk3wn.info/p/?p=73182 197. http://jh4xsy.asablo.jp/blog/2014/09/26/ 198. http://jh4xsy.asablo.jp/blog/2014/10/26/ 199. http://jh4xsy.asablo.jp/blog/2014/11/16/ 200. http://jh4xsy.asablo.jp/blog/2014/12/06/ 201. http://jh4xsy.asablo.jp/blog/2016/05/23/ 202. http://jh4xsy.asablo.jp/blog/2016/06/10/ 203. http://sdr.osmocom.org/trac/wiki/rtl-sdr 204. http://www.pe0sat.vgnet.nl/decoding/unix-tlm-decoding/ 205. http://www.nutaq.com/blog/gnu-radio-file-source-and-sink 206. http://ttrf.tk/post/34299017733/gnuradio-on-ubuntu-linux 207. http://www.csun.edu/~skatz/katzpage/sdr_project/sdr/grc_tutorial1.pdf 208. http://ecee.colorado.edu/~mathys/ecen4652/SDRsoftware/GNURadioInstall.html 209. http://forums.hak5.org/index.php?/topic/33506-easy-way-to-install-from-source-gnuradio-rtl-source-blocks/ 210. RTL-SDR(RTL2832U) installing (failed) 211. $ sudo apt-get install git-core 212. $ sudo apt-get install cmake 213. $ sudo apt-get install libusb-1.0-0-dev 214. $ sudo apt-get install build-essential 215. $ sudo -s 216. # mkdir rtl-sdr 217. # git clone git://git.osmocom.org/rtl-sdr.git 218. # exit 219. $ cd rtl-sdr 220. $ sudo -s 221. # mkdir build 222. # cd build 223. # cmake ../ -DINSTALL_UDEV_RULES=ON 224. # make 225. # sudo make install 226. # sudo ldconfig 227. # cd .. 228. # sudo cp ./rtl-sdr.rules /etc/udev/rules.d 229. # cd /etc/modprobe.d 230. # sudo nano no-rtl.conf 231. Type the following 3 lines in the editor. 232. > blacklist dvb_usb_rtl28xxu 233. > blacklist rtl2832 234. > blacklist rtl2830 235. [Ctrl+O (oh, not zero)] key -> [Enter] key -> [Ctrl+x] key 236. # sudo reboot 237. Plug RTL-SDR into an USB port. 238. [Ctrl+ALT+T] key -> Terminal 239. $ rtl_test -t 240. $ cd .. 241. $ sudo -s 242. # git clone git://github.com/pybombs/pybombs 243. # cd pybombs --- The following description cann't be confirmed. --- 244. # ./pybombs install uhd gnuradio hackrf 245. # ./pybombs install gr-osmosdr 246. # ./pybombs env 247. # source /home/je9pel/target/setup_env.sh 248. # gnuradio-companion --- The test of this part is temporarily stopped. --- 249. RTL-SDR(RTL2832U) installing (solved) 250. http://www.ne.jp/asahi/it/life/it/rf/sdr/sdr_server_ubuntu.html 251. $ sudo apt-get install git cmake autoconf automake libusb-1* 252. $ mkdir ~/sdr 253. $ cd ~/sdr 254. $ git clone git://git.osmocom.org/rtl-sdr.git 255. $ cd rtl-sdr/ 256. $ mkdir build 257. $ cd build 258. $ cmake ../ 259. $ make 260. $ sudo make install 261. $ sudo ldconfig 262. $ sudo /usr/local/bin/rtl_test -t 263. RTL-SDR(RTL2832U) is located in GNURadio -> Sources 264. after GQRX installing. 265. GQRX installing (failed) 266. [Ctrl+ALT+T] key -> Terminal 267. $ sudo -s 268. # sudo add-apt-repository -y ppa:ettusresearch/uhd 269. # sudo add-apt-repository -y ppa:myriadrf/drivers 270. # sudo add-apt-repository -y ppa:myriadrf/gnuradio 271. # sudo add-apt-repository -y ppa:gqrx/gqrx-sdr 272. # sudo apt-get update 273. # sudo apt-get install gqrx-sdr 274. If appear the message 'System program problem detected' 275. $ sudo rm /var/crash/* 276. $ sudo apt-get clean 277. GQRX re-installing (solved) 278. $ sudo -s 279. # sudo apt-get update 280. # apt-get -f install 281. # exit 282. $ sudo apt-get install gqrx-sdr 283. GQRX properly installed. 284. Reboot LINUX USB. 285. Search your computer -> Gqrx -> Confirm Device: 'Generic RTL2832U' 286. Setting [Receiver Options] -> Mode: Narrow FM, AGC: Off, etc. 287. Setting [Input controls] -> Freq. correction: -16.0 ppm, etc. 288. Setting [FFT Settings] -> dB range: 105 dB, etc. 289. Activate GQRX by clicking on the power button at the top left of the screen. 290. http://gqrx.dk/ 291. http://www.pe0sat.vgnet.nl/decoding/unix-tlm-decoding/ 292. http://voiceoverman.wix.com/noaam2#!setting-up-ubuntu-/mmr3u 293. Direwolf-1.3 decoding (solved) 294. http://github.com/wb2osz/direwolf 295. http://www.pe0sat.vgnet.nl/decoding/unix-tlm-decoding/ 296. http://github.com/wb2osz/direwolf/blob/master/doc/User-Guide.pdf 297. $ sudo apt install direwolf 298. Download 'direwolf.conf' at a site and place it into Ubuntu -> Home. 299. Edit MYCALL and delete '#' of the top of 'MODEM 9600' in direwolf.conf. 300. Press the '...' button at the bottom right in GQRX. 301. Confirm UDP host: localhost and UDP port: 7355 302. Press the 'UDP' button at the bottom right in GQRX. 303. $ direwolf -r 48000 -B 1200 (-B 9600) -t 0 udp:7355 304. Then 1200bps or 9600bps signal streams as 'GQRX -> UDP -> Direwolf -> Terminal'. 305. LINUX USB 起動方法 #2 306. LINUX USB 起動方法 #3 (補足) あれこれ cmake をいじっているうちに、cmake が壊れてしまった。(2019 5/17) ソースから改めてコンパイルしたが、復旧に半日掛かった。以下、その備忘録。 Download "cmake-3.13.5.tar.gz" from http://cmake.org/download/ Extract this "cmake-3.13.5.tar.gz" in Home folder $ cd cmake-3.13.5 $ ./configure $ make $ sudo -s # sudo make install # exit $ sudo make install $ sudo ldconfig $ cmake --version cmake version 3.13.5 cmake suite maintained and supported by Kitware (kitware.com/cmake). 簡単にコマンドを解説すると、 configure: これからインストールを行う OS の CPU やバージョンを調べたり 必要な関連ツールを調査する。そして,これらの状況を記述した makefileファイルを作成する。 make: configure で作成された makefile を基にしソースコードをコンパイル する。コンパイルとは、人間が書いたプログラムを PCにわかるように 変換すること。 make install: makeで生成されたバイナリファイルを、規定のディレクトリに コピー(インストール)する。 ldconfig: 共有ライブラリを PCに認識させる。ライブラリとは、よく使用 されるプログラムの共通部分を抜き出して、他のプログラムから 利用できるようにしたもの。 Close of the frozen LINUX Ubuntu Keep pressing "alt" and "Print Screen" and press R -> S -> E -> I -> U -> O > "alt" + "Print Screen" + R + S + E + I + U + O Restarting the frozen LINUX Ubuntu Almost the same as the close. Only the last key is different. > "alt" + "Print Screen" + R + S + E + I + U + B Remove message "System program problem detected" $ sudo rm -rf /var/crash/* $ sudo /etc/default/apport > enabled=1 -> enabled=0 $ sudo systemctl restart apport And, $ sudo gedit /etc/default/grub > GRUB_CMDLINE_LINUX_DEFAULT="quiet splash intel_idle.max_cstate=1" $ sudo update-grub
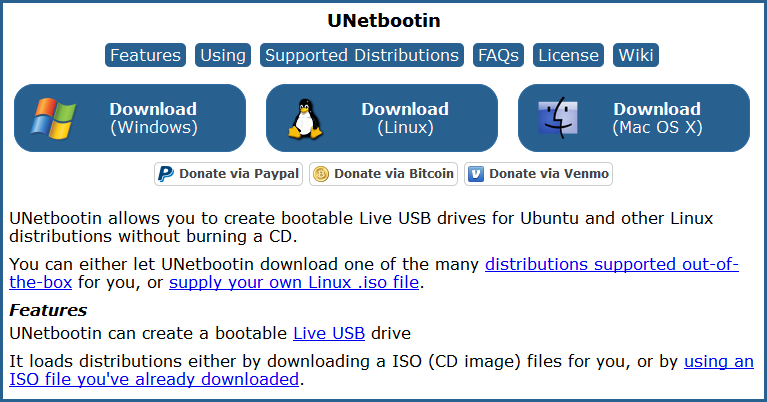
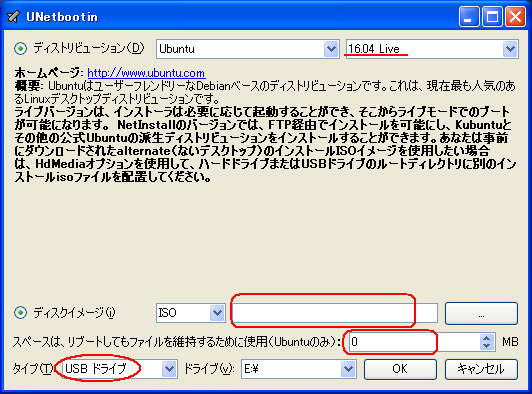
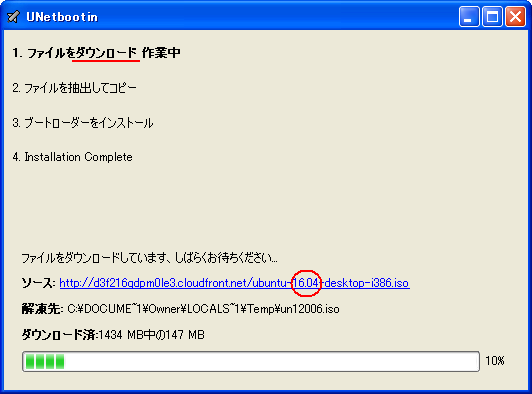
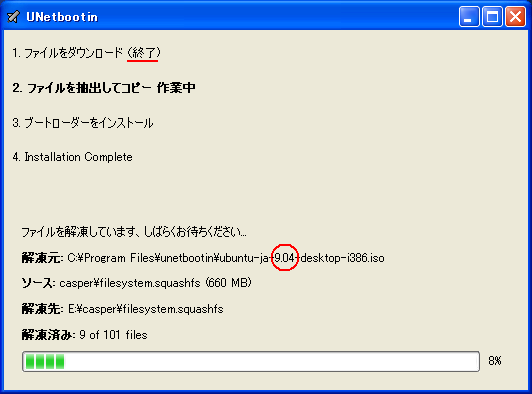
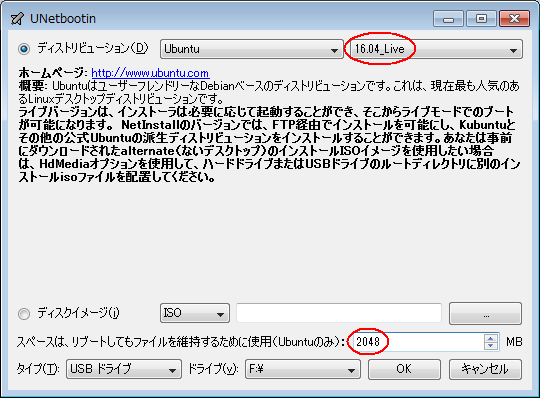
 トップ へ戻る.
 前のページ へ戻る.
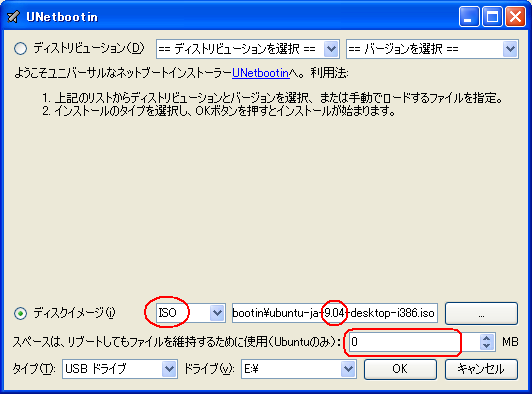
 次のページ へ移る.
 ホームページ(目次) へ戻る.