Part One
Handmade woodblock prints are one of the favourite
souvenirs taken home by visitors to Japan, and their beautiful
colours and soft fluffy paper have delighted viewers for over three
centuries. Whether it be a print of a geisha from a past age, a
kabuki actor strutting across the stage, or even a more modern image,
the woodblock technique seems to provide the perfect means of
expression to catch the essence of things Japanese.
 Elementary school students
in Japan all learn to make simple woodblock prints in their art
classes, and many of them keep it up as a hobby when they get older.
The most common type of prints they make are cards for New Year, and
thousands of people around the country keep albums full of hand
printed cards they have received in exchanges with friends or
acquaintances. Art supply stores and community centers set up
displays of such cards each January, and even the Post Office
sponsors a national competition for printmakers to enter.
Elementary school students
in Japan all learn to make simple woodblock prints in their art
classes, and many of them keep it up as a hobby when they get older.
The most common type of prints they make are cards for New Year, and
thousands of people around the country keep albums full of hand
printed cards they have received in exchanges with friends or
acquaintances. Art supply stores and community centers set up
displays of such cards each January, and even the Post Office
sponsors a national competition for printmakers to enter.
Professional printmakers study and train for many
years to reach the top levels of their craft, but as the actual
techniques of making prints are really quite simple, it is possible
for beginners to obtain very satisfying results on their first
attempts. Over the next few weeks or so in this space I will outline
the basic procedures for making simple woodblock prints. I will
include enough information to allow you to actually make your own
prints, starting from scratch and proceeding step-by-step to the
finished product. The same techniques can be used to make not only
prints for framing or collecting, but also personalized greeting
cards for Christmas or New Year, unique name cards (meishi), or
attractive stationery such as letter paper or envelopes. I will cover
selection and preparation of suitable designs, cutting the
woodblocks, doing the actual printing, sources for materials, tools
and instructional materials, and also ideas for other applications of
the woodblock technique.
 Only a few, quite
inexpensive tools will be needed. A special work place is not
necessary, and the dining room table (or kotatsu!) will do quite
well. As for artistic ability? Well of course, a budding Hokusai
could no doubt produce stunning designs, but even those of us who are
closer to that elementary school level can make beautiful prints. A
great deal of the beauty seems to lie in the production technique and
the materials themselves, and I can speak from personal experience
that a person with very modest creative abilities can turn out
satisfying work. Like to give it a try? Join me next week, and let's
get started!
Only a few, quite
inexpensive tools will be needed. A special work place is not
necessary, and the dining room table (or kotatsu!) will do quite
well. As for artistic ability? Well of course, a budding Hokusai
could no doubt produce stunning designs, but even those of us who are
closer to that elementary school level can make beautiful prints. A
great deal of the beauty seems to lie in the production technique and
the materials themselves, and I can speak from personal experience
that a person with very modest creative abilities can turn out
satisfying work. Like to give it a try? Join me next week, and let's
get started!
Part Two
Woodblock prints are made by what is known as a
'relief' process. Planks of wood are carved to leave raised areas on
which pigments are brushed. The colours are transferred to paper by
rubbing with a tool known as a 'baren'. The step-by-step instructions
in this series of columns will cover preparation of a design,
transferring it to wood blocks, carving, printing, and
troubleshooting. As space in the column is limited, descriptions will
necessarily be quite concise. Read carefully, and if my instructions
leave you a bit unclear on what to do at any point, don't hesitate,
try .... 0428(22)2212!
When I receive correspondence from Japanese
friends, it is frequently written on handmade paper decorated with
seasonal designs. Use of such paper is very popular in Japan, and I
thought that it might be a good idea for our demonstration of the
woodblock printing process to show how to make some.
As this is April, and I'm not particularly
imaginative, I will use a simple design of cherry blossoms based on
origami flowers folded by my wife. The pattern will appear in two
opposite corners of the notepaper with the rest remaining blank for
the message. Making the master sketch is the first step, and this
should be drawn the same size as the final print. For your first
printmaking attempt, avoid including many small details in your
design, and stick to simple masses of colour. 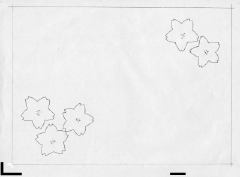 After you have something suitable down on paper
(any handy paper will do), pencil in an outline to show where the
edge of the print will fall, and then about a centimeter outside this
line, mark in the position of two printing paper guides that we will
later carve on each woodblock, an 'L' shape in the lower corner, and
a simple straight line along the bottom edge (see photo). (All
printing will be done with the paper held along its length, and not
'standing up'.)
After you have something suitable down on paper
(any handy paper will do), pencil in an outline to show where the
edge of the print will fall, and then about a centimeter outside this
line, mark in the position of two printing paper guides that we will
later carve on each woodblock, an 'L' shape in the lower corner, and
a simple straight line along the bottom edge (see photo). (All
printing will be done with the paper held along its length, and not
'standing up'.)
My notepaper is to be printed in three colours,
pink blossoms, a yellow highlight, and a green background. Each will
need a separate woodblock, so three tracings must now be prepared to
guide the carving, one for each colour. These tracings are made by
taking pieces of thin paper and pinning them in place over the master
sketch, one at a time. On each one, trace around the outline of all
the areas where that particular colour is to appear, using a fine
point marker. Ignore everything else. 'Shading in' these outlined
areas will make it a bit easier to do the carving later. Also trace
(carefully!) the exact position of those two paper guides. We thus
get a sheet matching one colour that appears in the print. A
complicated woodblock print design can require dozens of these
tracings, but I think that we'll stick with about three for now
...
In next week's column, we'll paste the finished
tracings onto the blank woodblocks and start carving. See you
then!
Part Three
Finished your homework? Colour separation tracings
all ready? Let's get on with the carving!
Before the cutting can begin, the tracings must be
glued onto the woodblocks. Use a standard household paste, spread a
thin layer smoothly over the surface of the block, and then place the
tracing FACE DOWN in position on the wood. (Later, when we are
printing, that paper also will be placed face down to receive the
colour). Smooth out the tracing paper carefully, being sure not to
distort it or stretch it in any direction. Repeat the process on
another block with each tracing (using both sides is OK).
 For carving, we will use
three knives from a standard 'school' set, first cutting around the
outlines with the main carving knife ('toh'), next removing wide
unwanted areas with the round chisel ('marunomi'), and finally
trimming away waste close to the printing areas with the small flat
chisel ('aisuki').
For carving, we will use
three knives from a standard 'school' set, first cutting around the
outlines with the main carving knife ('toh'), next removing wide
unwanted areas with the round chisel ('marunomi'), and finally
trimming away waste close to the printing areas with the small flat
chisel ('aisuki').
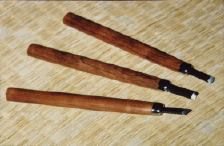
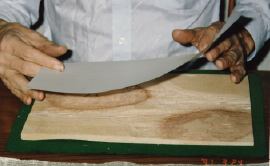
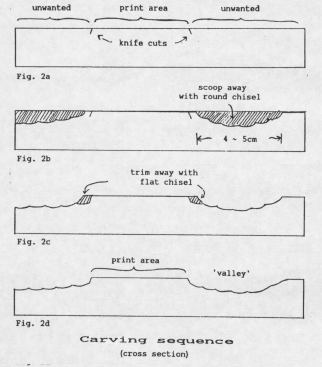 You can hold the carving
knife either in your fist (giving stronger cutting), or just like a
pencil (giving easier guidance). Cut around the outlines, holding the
knife at an angle that will produce a beveled edge on the final areas
(Fig. 2a). Keep the tip of the blade about 1 ~ 2mm deep in the wood,
and go right around the entire outline of each area. When this is
done, switch to the round chisel, and start gouging away the waste
wood (unshaded portions of each tracing). Only the waste lying within
about 5cm of any printing area will need to be removed. You should
aim to create a 'valley' around each of these areas, with a depth
that varies with the distance (Fig. 2b). Hold the chisel firmly in
one hand, and guide the tip with the fingers of the other, always
being careful to keep your fingers safely behind the cutting edge.
Work with a scooping motion, changing direction as the grain of the
wood dictates. Do not carve right up to the outlines previously cut
with the 'toh', but keep a short distance away.
You can hold the carving
knife either in your fist (giving stronger cutting), or just like a
pencil (giving easier guidance). Cut around the outlines, holding the
knife at an angle that will produce a beveled edge on the final areas
(Fig. 2a). Keep the tip of the blade about 1 ~ 2mm deep in the wood,
and go right around the entire outline of each area. When this is
done, switch to the round chisel, and start gouging away the waste
wood (unshaded portions of each tracing). Only the waste lying within
about 5cm of any printing area will need to be removed. You should
aim to create a 'valley' around each of these areas, with a depth
that varies with the distance (Fig. 2b). Hold the chisel firmly in
one hand, and guide the tip with the fingers of the other, always
being careful to keep your fingers safely behind the cutting edge.
Work with a scooping motion, changing direction as the grain of the
wood dictates. Do not carve right up to the outlines previously cut
with the 'toh', but keep a short distance away.
The last stage is the final trimming with the
small flat chisel. Use it in the same fashion as you did the round
chisel, guiding with your fingers, and carefully pare away the waste
wood right up to the outlines (Fig. 2c).
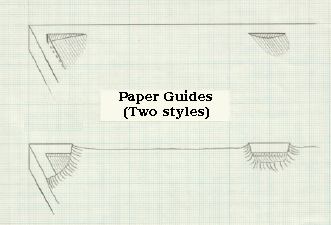
When the main carving is done, it is time to cut
the two guides on each block for the printing paper. Use the main
carving knife to cut on the lines, and the small flat chisel to clear
away the waste, and make a couple of shallow ledges like those shown
in the next photo. Cutting these ledges will allow the paper to be
positioned in the proper location on each block to allow the colours
to line up perfectly. When this is done, wash the blocks to remove
leftover tracing paper, and get ready to start mixing your colours.
Until next week ....
Part Four
Are you still with me? I hope so, because we're
getting closer to the payoff, and soon you'll see your finished
print!
Before we can start printing, there is a bit of
preparation to do.....
Paper: It is inconceivable
that we would use any paper other than 'washi' (Japanese traditional
paper) for woodblock printmaking. The long fibers provide the
strength necessary to stand up to the beating it gets when being
rubbed onto the blocks, and yet also give it the famous soft fluffy
texture for which it is famous. Many types of washi are suitable for
woodblock work. If you are choosing one in a paper shop, ask the
advice of the clerk, and try to get one not too thick, not too thin.
A 'sized' paper (in Japanese - with 'dosa') is preferable. Two common
woodblock papers are 'hosho' and 'torinoko'.
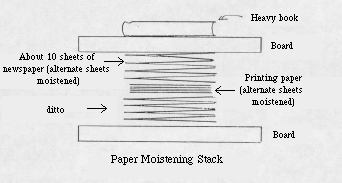 Cut the paper to the
appropriate size for your print, remembering to leave extra margins
for the paper to fit into the guides carved on the woodblocks. (These
margins will be trimmed off after printing.) For your initial
printing attempt, a stack of about 10 sheets should be sufficient for
experimentation. Before the actual printing can begin, the paper must
be moistened. If we tried printing on dry paper, it would expand
unevenly as it absorbed the water from the blocks, and registration
of multiple colours would become impossible. One convenient way to
moisten the paper is to press it between sheets of wet newspaper for
a couple of hours (pros do it the night before). Use a shallow basin
of water and a brush like a wallpaper brush (or wide, clean
paintbrush), dampen alternate sheets of both the printing paper and
the sheets of newspaper, then stack them together as shown in the
picture, and wrap the stack in a plastic garbage bag until the
moisture has equalized. What level of dampness are we aiming for? The
printing paper should end up feeling about like a shirt that has just
come out of the spin drier, ready for hanging on the clothesline.
Make sense?
Cut the paper to the
appropriate size for your print, remembering to leave extra margins
for the paper to fit into the guides carved on the woodblocks. (These
margins will be trimmed off after printing.) For your initial
printing attempt, a stack of about 10 sheets should be sufficient for
experimentation. Before the actual printing can begin, the paper must
be moistened. If we tried printing on dry paper, it would expand
unevenly as it absorbed the water from the blocks, and registration
of multiple colours would become impossible. One convenient way to
moisten the paper is to press it between sheets of wet newspaper for
a couple of hours (pros do it the night before). Use a shallow basin
of water and a brush like a wallpaper brush (or wide, clean
paintbrush), dampen alternate sheets of both the printing paper and
the sheets of newspaper, then stack them together as shown in the
picture, and wrap the stack in a plastic garbage bag until the
moisture has equalized. What level of dampness are we aiming for? The
printing paper should end up feeling about like a shirt that has just
come out of the spin drier, ready for hanging on the clothesline.
Make sense?
While the paper is 'cooking', the other materials
can be prepared.
Paste: Using a paper cup
and an old chopstick, take some white household paste (just like we
used for pasting the tracing on the blocks) and blend it with water
to about the consistency of .... of what? Well, how about - runnier
than face cream, thicker than pancake batter. Make sense?
Pigments: Printmakers use
many types of pigments, but probably the easiest ones for beginners
to handle are standard watercolours from tubes. You can either pick
the colours you want from the selection at the store, or mix your
desired shades using primaries, just like you did back in elementary
school. Whichever way you choose, squirt some of the desired colour
into a saucer or shallow bowl, add water, and mix to about the
consistency of .... of what? This will be up to you. A very watery
mixture will produce a light, delicate colour in the finished print.
Using less water will result in a deeper, stronger colour. You have
complete control, and will have to experiment to find the combination
that suits you. For my sample notepaper, where I wanted a very
delicate tint, I diluted the pigments to about the strength of
tea.
Lay a damp towel under the woodblock so that it
won't slide on the table while you're printing (only very slightly
damp - otherwise the block will warp upwards ...), and lay out your
materials ready for use - pigment bowl with the small paintbrush, cup
of paste with a chopstick, the woodblock printing brush, the baren,
the stack of moistened paper (tucked away inside wet newspapers to
keep it damp), and a basin of water with your moistening brush
standing in it. A few minutes before starting, use this brush to
moisten the surface of the woodblock so that it will be ready to
receive the colour.
So there we are. The preparation is all done, and
next week we'll finally start the actual printing work. See you
then!
Part Five
Welcome back! Colours mixed? Paper moist and
ready? Let's get on with it! Making each colour impression is a
simple step-by-step process. A few minutes before starting printing,
moisten the surface of the block well.
1) Transfer some colour to the woodblock. How
much? Just a moderate smear. Don't try to 'paint' the block, just
move some pigment over there. After seeing the final result, you will
be able to see if you need more or less colour next time.
2) Transfer some paste to the woodblock. How much?
Just a blob hanging from the end of the chopstick (more for wide
areas). Don't be stingy. Without paste, the colour will be weak and
blotchy. Too much doesn't really hurt at all.
3) Mix these together with the main brush. Dig in.
Imagine you're scrubbing the floor with it. The colour and paste must
be spread thoroughly over all the raised portions of the block. Add
more pigment or paste if there doesn't seem to be enough. Don't rub
the brush over those places outside the 'valley' we previously carved
around the design areas. The final few strokes should be soft,
gentle, and straight across the block, to smooth out the mixture. If
you position a desk light shining on the work area, you should be
able to see a smooth, glossy layer covering the block. Move on
quickly to the next step (before it starts to dry).
 4) Put some paper on the
block. That's easy for me to say! (This is awkward, and I should have
asked you to practice this step before we started.) Slip a sheet out
of the damp newspapers, and hold it face down as in the photo with
the second and third fingers of each hand. No thumbs. Slide the
corner into the 'L' mark carved on the block. Put your thumb down to
lock it in place. Place the other side of the paper against the
straight guide. Put your thumb down to lock it there. Let go with
your fingers, while keeping your thumbs down firmly. When the paper
has fallen smoothly onto the wet block, lift your thumbs off gently,
trying not to disturb the position of the paper. Move right along
....
4) Put some paper on the
block. That's easy for me to say! (This is awkward, and I should have
asked you to practice this step before we started.) Slip a sheet out
of the damp newspapers, and hold it face down as in the photo with
the second and third fingers of each hand. No thumbs. Slide the
corner into the 'L' mark carved on the block. Put your thumb down to
lock it in place. Place the other side of the paper against the
straight guide. Put your thumb down to lock it there. Let go with
your fingers, while keeping your thumbs down firmly. When the paper
has fallen smoothly onto the wet block, lift your thumbs off gently,
trying not to disturb the position of the paper. Move right along
....
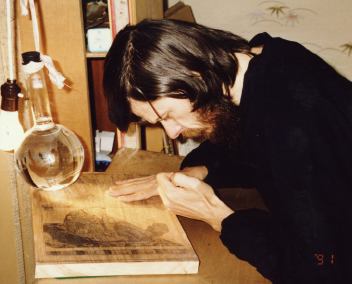
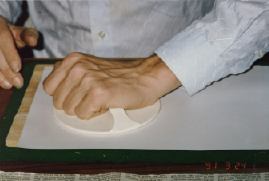 5) Grasp the baren, and
rub the back of the paper to create the impression. How hard to
press? Harder than you think. This is tough paper, even if it is wet,
and you are trying to press the pigment right into it. Apply pressure
with the heel of your hand, rather than through your fingers (see
photo). Rub in a side-to-side motion at first, and then in a circular
pattern. Cover all the necessary areas, and only those areas. Rubbing
where the 'valley' is carved will leave you with blotches in unwanted
areas. It should be done in a few seconds. If the paper is thin,
pressure should be lighter, but a thick paper will need real grinding
away at it. If necessary, the baren can be lubricated with a drop or
two of camellia oil to help it slide.
5) Grasp the baren, and
rub the back of the paper to create the impression. How hard to
press? Harder than you think. This is tough paper, even if it is wet,
and you are trying to press the pigment right into it. Apply pressure
with the heel of your hand, rather than through your fingers (see
photo). Rub in a side-to-side motion at first, and then in a circular
pattern. Cover all the necessary areas, and only those areas. Rubbing
where the 'valley' is carved will leave you with blotches in unwanted
areas. It should be done in a few seconds. If the paper is thin,
pressure should be lighter, but a thick paper will need real grinding
away at it. If necessary, the baren can be lubricated with a drop or
two of camellia oil to help it slide.
6) Peel off the paper with a quick motion, inspect
your work, and slip it back under the newspaper where it will remain
moist until the next colour. If you've prepared, say 10 sheets,
repeat this process on all 10, making adjustments as necessary
depending on the results (more/less pigment, longer/harder rubbing,
more careful brushing, etc.). When done with the 10, change the
block, and move on to the next colour. And so on until you're
finished....
There's more to discuss, but we're about out of
space this week. I'll cover some further aspects of the printing
procedure in our wrap-up column next week. But go ahead, don't wait
for me. Get busy!
Part Six
Hello again, and how did you make out with your
printing during the week? What, you had problems?
Is the impression uneven, no colour in some areas?
Perhaps you:
- waited too long before getting the paper on
the block, and the pigment dried in place.
- didn't brush the pigment thoroughly over the
entire area.
- didn't use enough pigment and paste.
- didn't rub firmly enough with the
baren.
- missed some areas with the baren.
- don't have enough moisture in the
paper.
The colour is not smooth, but 'watery'. Perhaps
you:
- didn't use enough paste.
- have just too much water in the pigment
mixture.
- have too much moisture in the paper.
Smears of colour show in unwanted areas (different
every time). Perhaps you:
- pressed the baren into that valley surrounding
the coloured areas. (try and keep it absolutely horizontal)
Smears of colour show in unwanted areas (similar
each time). Perhaps you:
- didn't carve those unneeded areas deep
enough.
Different colours don't 'register' properly.
Perhaps you:
- are not getting the paper nicely placed into
the guide marks on the blocks.
- didn't carve the guide marks in the correct
place.
- stretched the transfer paper when pasting it
down (if so, you'll have to re-carve that block from
scratch).
The colour is too weak. Perhaps you:
- have diluted the pigment mixture too
much.
- are not putting enough pigment on the
block.
- are not pressing firmly enough with the
baren.
Colour 'blobs' hang over the edge of the printed
areas. Perhaps you:
- are using way too much paste
- are forgetting the final gentle strokes with
the brush
Looking at this list of possible problems may make
you think that it's impossible to get it right! Actually, the
printing process is really not difficult - once you've got a bit of
experience under your belt. If your first attempt is not so
attractive, please don't give up at that point. Take a close look at
it and try to figure out what needs to be altered to improve it. If
you're still stuck after trying the hints in the above list, give me
a call and maybe I can help. If you're still stuck, then bring your
stuff over to my place, and we'll work it out together.
I hope that this little series has provided enough
of a stimulus to get you started in woodblock printmaking. I would be
very interested in seeing samples of your hand-printed pictures,
namecards, calendars, fans, book covers, gift wrapping paper, origami
paper, ex libris, stationery, and of course New Year cards. I'll make
you a promise - send me a sample of your work - and I'll send you one
of mine. I'm waiting!