|
Page 1 of 1 |
Impreza WRX STi Page 1 |
Updated on 09/29/01 |
| About the Kit |
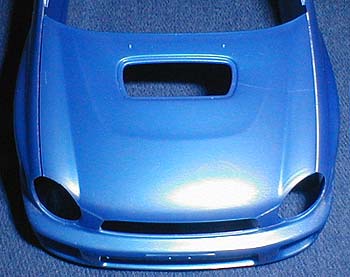
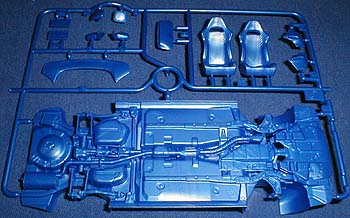 The
most significant change from typical Tamiya kit is its chassis. The
front and rear suspension details are molded with the chassis, and the
front wheels are not posable. The exhaust pipe is also molded with
the chassis, so only careful painting will enhance the appearance.
Although once, the model is complete, no one picks up and look at the
bottom, so this might serve its purpose. The seats have adequate
thickness, and rear wings feature complicated 3D free surface. The
most significant change from typical Tamiya kit is its chassis. The
front and rear suspension details are molded with the chassis, and the
front wheels are not posable. The exhaust pipe is also molded with
the chassis, so only careful painting will enhance the appearance.
Although once, the model is complete, no one picks up and look at the
bottom, so this might serve its purpose. The seats have adequate
thickness, and rear wings feature complicated 3D free surface. |
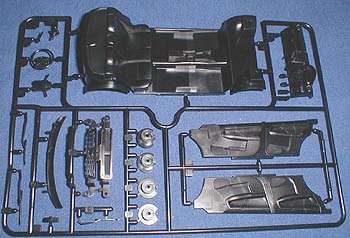 The
interior details are typical Tamiya. It's somewhat simplified, but
still looks realistic. The sides are separete pieces. The tree
also has the disk brakes, that are meant to be directly glued to the
chassis part. The
interior details are typical Tamiya. It's somewhat simplified, but
still looks realistic. The sides are separete pieces. The tree
also has the disk brakes, that are meant to be directly glued to the
chassis part. |
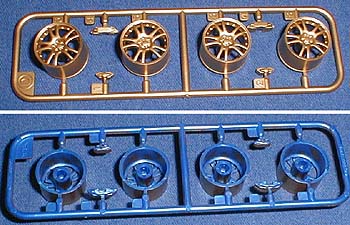 Tamiya
supplied the painted wheels and brake calipers, and they look good, but
the back side isn't painted. Other parts such as colored flashers
are attached to the body openings where the back side is held with self adhesive
metal foil. Tamiya
supplied the painted wheels and brake calipers, and they look good, but
the back side isn't painted. Other parts such as colored flashers
are attached to the body openings where the back side is held with self adhesive
metal foil. |
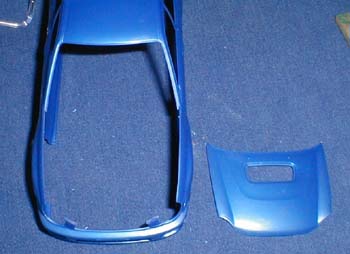
 Since
Tamiya didn't include much of the detail in the kit, the missing parts
have to be scratchbuilt. I've always thought about turning a
curbside kit into a fully detailed model, so I picked the Impreza as a
subject. The first task is to cut the hood from the body, and this
can by achieved by using the back side of a very fine OLFA knife.
Slowly carving the body along the panel line to make it deeper and deeper
until the blade reaches the back side. One side probably takes 10
minutes or so but with steady and patient progress will create a better result. Since
Tamiya didn't include much of the detail in the kit, the missing parts
have to be scratchbuilt. I've always thought about turning a
curbside kit into a fully detailed model, so I picked the Impreza as a
subject. The first task is to cut the hood from the body, and this
can by achieved by using the back side of a very fine OLFA knife.
Slowly carving the body along the panel line to make it deeper and deeper
until the blade reaches the back side. One side probably takes 10
minutes or so but with steady and patient progress will create a better result. |
 The
left groove is fully cut, while the right side is still untouched.
It's hard to see, but the width of the groove remains unaffected because
the blade was narrower than the groove. The
left groove is fully cut, while the right side is still untouched.
It's hard to see, but the width of the groove remains unaffected because
the blade was narrower than the groove.
|
 The
other side was also done by carving along the line. Make sure to cut
the front part before detaching the hood, or use tape to hold it. Otherwise, it will bend the front bridges next to the
headlights. Use file to clean the edges of the hood and front fender
panels. If paint is expected to narrow the groove, leave the part as
is. If the width of the hood lines are expected to be
unrealistically wide, add a sheet of plastic along the edges. The
other side was also done by carving along the line. Make sure to cut
the front part before detaching the hood, or use tape to hold it. Otherwise, it will bend the front bridges next to the
headlights. Use file to clean the edges of the hood and front fender
panels. If paint is expected to narrow the groove, leave the part as
is. If the width of the hood lines are expected to be
unrealistically wide, add a sheet of plastic along the edges. |
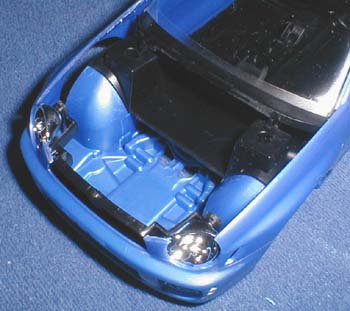 The
picture shows an empty engine room. For a complicated tasks, it's recommended
to break down into several sections and list the parts necessary to
scratchbuild. The body and chassis will need the firewall, inner
side, wheel housing and strut tower, forward frame, radiator, brake
booster and cylinder assembly, battery, ABS controller, washer bottles,
coolant bottle, etc. The
picture shows an empty engine room. For a complicated tasks, it's recommended
to break down into several sections and list the parts necessary to
scratchbuild. The body and chassis will need the firewall, inner
side, wheel housing and strut tower, forward frame, radiator, brake
booster and cylinder assembly, battery, ABS controller, washer bottles,
coolant bottle, etc. |
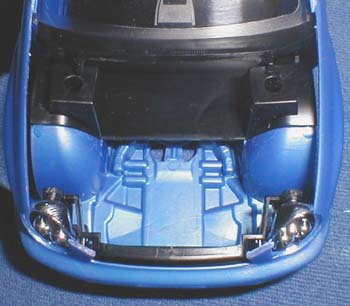 It
will probably be a good idea to start with the side panel and strut tower assemblies.
Then, firewall and front section, including the radiator and head light
bracket. Many parts that are common with all cars, such as battery
and brake booster will be taken from another kit. It
will probably be a good idea to start with the side panel and strut tower assemblies.
Then, firewall and front section, including the radiator and head light
bracket. Many parts that are common with all cars, such as battery
and brake booster will be taken from another kit.
I'm hoping to show the surrounding walls in the engine room in the next update. |
Impreza WRX STi Page 1 |
|
|