"U.S.S. ENTERPRISE" MATCHBOX VERSION
 Making parts with lighting Making parts with lighting
「パーツの組み立て(その3)」
こんばんは。またまたご無沙汰の更新になってしまいました。すいません、仕事してました。沖縄にも行ったりしてました(詳しくは後日blgページに書いときます)。
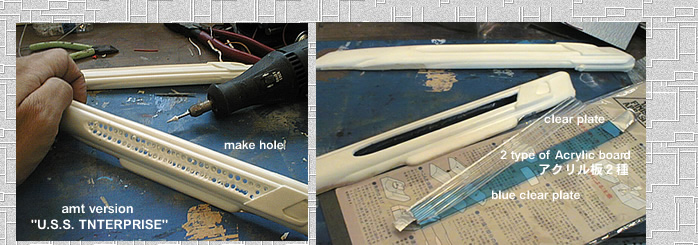
で、ワープナセルの側面の作り込みに入りました。まずはワープナセルの側面の「光る箇所」を完全に開口させます。まずはドリルで開口させる部分に沿って穴を開けます(写真)。それが終わったら、その部分を抜いて、周囲をドリルで粗く仕上げてから、耐水ペーパーで磨きます。
それに今回側面に使う「波板風の透明プラスチック板」と「ブルーのプラ板」を開口部に付けるサイズで切り出します(写真)。
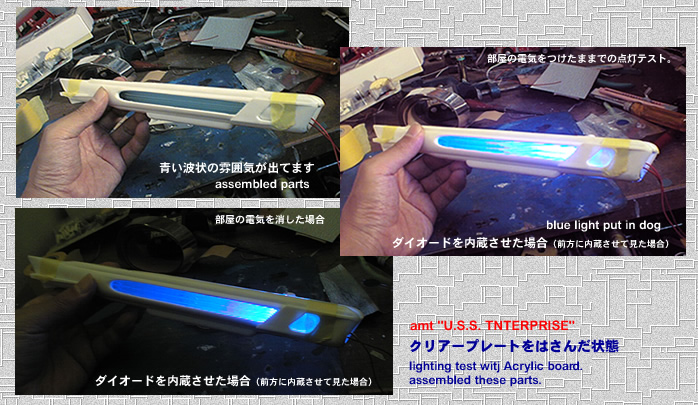
で、これをテープで仮止めして様子を見ます(写真)。光ってなくても、青いすりガラス状になるので、みかけは「バンダイ版」と同じ感じになります。ま、及第点取れてます。で、この舳先に「高輝度ダイオード」を仕込んで、試しに電気を流してみます(写真)。すごい!部屋の明かりをつけていてもバッチリ輝いています。「バンダイ版」は部屋の明かりがついていると「あまり輝かない...」ので、これはかなりグーです。
で、部屋の明かりを消した写真が最後の写真です。思いっきり光ってます。このままワープしちゃいそうな感じです。たぶん、この写真で見るよりも現物を直に眺めた時の方がインパクトはあると思います。
とりあえずこんな感じでいけそうな感触をつかみました。では、目指せ!毎週更新で今週も頑張ります。続きはまた....。(2006.06.18)
Good evening. Sorry, it is log time since last update. Because I was working, Going to Okinawa, it was very hard.
So, it is making the nacelle side. At First , nacelle side was opened many hole for electric parts. the hole is bored along side the part which it opens with the drill (photograph). When that ends, put off the part of that, after around finishing roughly with the drill, it polishes with the waterproof paper.
And, it is test constructed with "the F.R.P corrugated sheet" and "the F.R.P blue board" (photograph).
So, temporarily construct this with the tape, (photograph). If it is not electric , it becomes blue frosted glass condition, it becomes the same feeling as the "BANDAI version". So, testing the "high brightness diode" , it tries letting flow electricity to trial, (photograph). Nice! Attaching the lamp of the room, perfect it has shone. As for the "BANDAI version" when the lamp of the room has been attached, "where it does not shine excessively" , so this is very nice.
So, the photograph which turns off the lamp of the room is the last photograph. It is shining, This way, is good....
with such feeling, I will upadate this page Every week. To be continued.......(2006.06.18)
|