"U.S.S. ENTERPRISE" MATCHBOX VERSION
 Making parts with lighting Making parts with lighting
「パーツの組み立て(その1)」
こんばんは。今回から具体的な「組み立て」に入りたいと思います。今回は後部の推進部のワープナセルの光らせかたを検討してます。
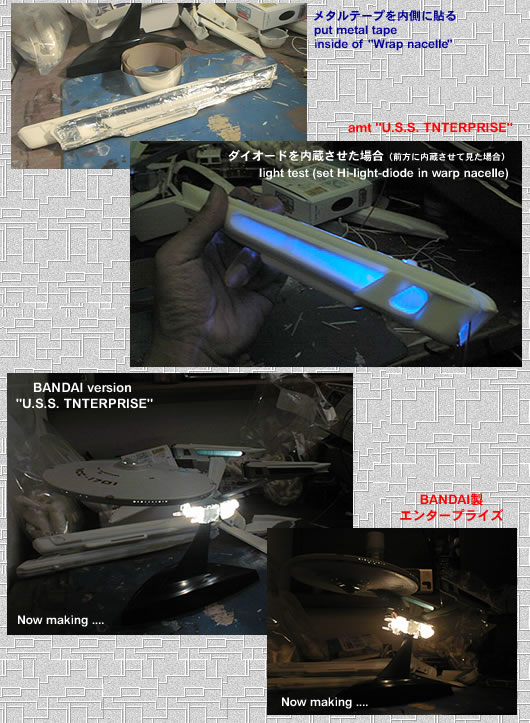
まずはワープナセルの裏側にキッチンとかで使うメタルテープを裏貼りします。試しに「光らせたい部分」だけシールを貼らないでおきます。これを両面に丁寧に貼っていきます。
で、これに青の高輝度ダイオードを仕込んで光らせてみると写真の通りです。ばっちりです。これで両面を光らせることができます。ライトの位置は映画をもう一度確かめてからにしますが、前方に付けるのが正しい気がしてます。でもこの青っていいですねえ....。すっかり気に入ってしまいました。
話変わって....同時に"BANDAI version"
製のエンタープライズがほぼ組み上がってます。同時にライティングの状態を確認してますが、この構造は難解って言うか、これは採用できないですねえ....。写真では分かりにくいのですが、豆球で光らせたライトに透明プラスチックを沿わせてそのエッジが光るという方法を取ってます。透明プラスチックのブロックの加工は私にはすごく難しいというか、無理なので、やはり私の方は光ファイバーを採用しようと思ってます。
あと、前回書きましたが"BANDAI version"
製のワープナセルは内側しか光ません。これって何故なんでしょう? 両側でもできたような気がするのですが....。ちょっと寂しい...ですよね。
あと"BANDAI version"
製は「接着剤不要」で素晴らしい....キット?なのかもしれませんが、私にはこの「接着剤不要」がかなり難しく感じられました。ぴったりと合わない...んです。何カ所か割れてしまったり、途中ではずれてしまったり.....。これ作った方、簡単でした? 設計した方はうまくいったんでしょうか?
次回は本体と言うか、円盤の部分にも手をつけたいと思ってます。続きはまた...。(2005.09.27)
Good evening, I will "assembling". And "Lighting of nacelle".
At First ,I put kitchen metal tape inside of nacelle.
And test,the high brightness blue diode is used(photograph). It is the nice. Now it is possible to put both sides. Now I am verifying the movie , the light is located to the front. So this blue light is good, I liked this.
By the way ,The enterprise of "BANDAI version". It was completed almost. Verifying the state of lighting simultaneously , but it is very difficult , I cannot understand this.....With the photograph you can not understand, but making this , there is many plobrem at this kit. So I will chose optical fiber at AMT version.
And , the last time I wrote,There is not electric parts both side nacelle at "BANDAI version" Why? both side?
And "BANDAI version" can be construct at "no adhesive". But I feel very difficult for me. It is not suit all of parts....... Is this kit easy for all people? To be continued....... (2005.09.27)
|