These program are free. You can download from Yahoo groups, hamlogger reflector's File area. Any comment will be very much appreciated..
adifUtility ver1.0 2012/5/7
<General>
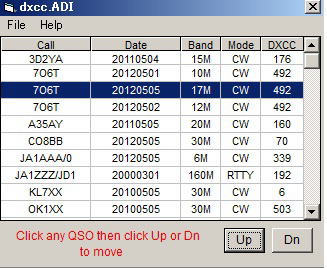
You may need re-arrage QSO record in dxcc.adi exported by Logger32.
adifUtility re-arrages QSO record in dxcc.adi and export DXCC_Submit.adi for DXCC submission.
Please read related doccument by ARRL very carefully and following example VE6LB Gerry provides.
Example:
3 QSL cards from JA1NLX
Cards #1
1-80 meters Jan 2000
2-40 meters Feb 2002
Card #2
3-30 meters Mar 2011
4-20 meters Jun 2008
Card #3
5-17 meters Sep 2005
6-12 meters Jun 2006
L32 ADIF output sequence 1,2,5,6,4,3 (dxcc.adi)
The needed order is 1,2,3,4,5,6
So, we need to:
-move 5 and 6 down
-move 3 and 4 up.
<How to use>
1) Place adifUtility.exe in any folder.
2) Open adifUtility.
3) Click File, Open ADIF file.
4) Click any QSO record you want to move up/down. Click Up or Dn button. It moves up or down per click.
5) Repeat step 4) if you have some QSO records to move.
6) Click File, Export DXCC_Submit.adi.
7) DXCC_Submit.adi is written in adifUtility folder.
<Version history>
Ver1.0 2012/05/07
1) Initial public release.
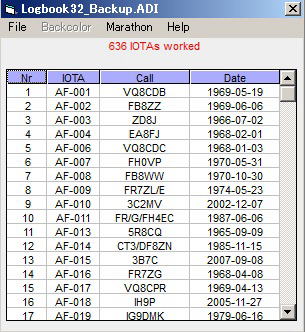
CheckIOTA ver3.10 2012/9/13
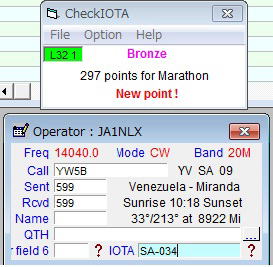
CheckIOTA is to check point for IOTA Marathon. It works together with Logger32 ver3.40.0 or later.
It tells you whether entered IOTA is "New point" or "No point" If you want you can play your favourite wav file when it shows "New poinr" Read IOTA Marathon rule by RSGB first.
1) Place CheckIOTA.exe in any folder you prefer.
2) You must dreate CheckIOTA.txt first.
a. Export Logbook adif from Logger32.
b. Open CheckIOTA. Click "Option" then click "Create CheckIOTA.txt and CheckIOTA.adi"
c. CheckIOTA.txt and CheckIOTA.adi are created in CheckIOTA folder. CheckIOTA.adi is not used at present time.
d. Close CheckIOTA.
3) Open Logger32.
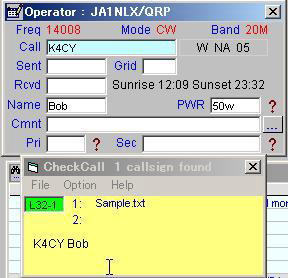
4) Open CheckIOTA. At top-left corner you see "L32 n" (n=1 -5) This meas connection between Logger32 and CheckIOTA is established.
5) You see "Total m points for Marathon". (m means number of records in CheckSpot.txt).
6) Enter callsign and IOTA in Logbook entry window. Or click DX spot and enter IOTA in Logbook entry window if necessary.
7) It tells you message like this.
a. if this is new IOTA (no QSO records in CheckIOTA.txt) or new Band IOTA (1 or 2 QSO records in CheckIOTA.txt) then it tells you "New point !"
b. if this QSO is logged then this records is added in CheckIOTA.txt and you see "Total m+1 points for Marathon".
c. if this QSO is not new Band IOTA or 3 QSOs are already in CheckIOTA.txt then you see "No point !"
d. if this QSO is logged then nothing added in CheckIOTA.txt.
If you want to play your favourite wav file when you get "New point" then
a) Click "File" then click ""Select sounf file". Select your favourite sound. (Attached Saple_1.wav and Sample_2.wav)
b) Click "Option" then check "Sound eabled"
<Other feature>
1) Text on title bar (Option menu)
You can select either of "CheckIOTA" or "nnn IOTAs worked" or your own message (your wife's birth day etc)
You can make your own message by clicking "File" then "Edit your message"
2) Setup text color and background color. (Option menu)
3) View list (Option menu)
a. CheckIOTA.txt (Sorted)
b. IOTAs worked (sorted)
4) Edit checkIOTA.txt (File menu)
<Note>
1) Editing Logbook page window does nothing with CheckIOTA.txt. You must edit CheckIOTA.txt or create CheckIOTA.txt reading latest Logbook adi.
2) You see total points for Marathon in Logger32 IOTA award table too.
3) There may be another bug in CheckIOTA. Please check often whether both show "same" IOTA points or not.
4) You see "New IOTA for Marathon" message in Logger32 upper status bar. (This is not "new point" but "new IOTA")
CheckColor ver2.4 2012/1/21
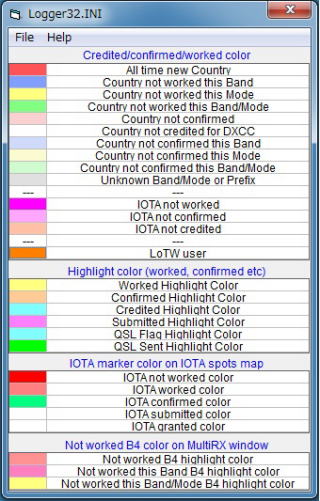
CheckColor is an external program which reads Logger32.ini (or your ini) and shows a color box for most of highlight/background color you configure.
As you know Logger32 provides many choices of highlight/background color. Can you always understand what each color means when you see the Logbook Page Window, Award Table or DX Spot Window, etc? Probably not. This will help you!
<Installation>
(1) If you have used older version then delete CheckColor.ini first.
(2) Unzip CheckColor.zip. Place CheckColor.exe in Logger32 folder.
(3) Set CheckColor as one of your utility programs. If you place a check mark you can open CheckColor automatically.
<How to use>
(1) Open CheckColor.
(2) If this is the first time to open CheckColor ver2.4 then you see Window's file selection window.
(3) Select Logger32.ini. If you are using another ini rather than Logger32.ini (JA1NLX.ini, Contest.ini, etc) then you must select your ini.
(4) CheckColor shows color table reading Logger32.ini (or your ini)
If you see a blank box for corresponding highlight/background color then it means that you have never set color for this.
(5) If you change ini file then click File, Select INI file. After selecting ini file you must close/re-open CheckColor.
<Note>
(1)CheckColor shows following groups.
a. Credited/confirmed/worked color
b. Highlight color (worked, confirmed etc)
c. IOTA marker color on IOTA spots map
d. Not worked B4 color on MultiRX window
(2)CheckColor stay always in 'always on top' state. Window's width/height is fixed. Used ini file path/title and window's position is saved in CheckColor.ini.
<Version history>
ver2.4 2012/1/21
(1) Changed IOTA marker color table to support Logger32 ver3.38.0
(2) Added File menu
(3) Changed start-up process
(4) Added Tips.
CheckColor idea has been suggested by K5LAD Jim. Thanks Jim
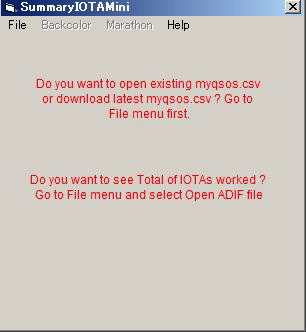
SummaryIOTAMini ver2.3 2012/5/4
This is fully revised version of Summay_IOTA.xls.
<General>
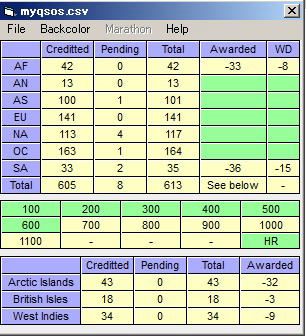
1) It reads downloaded "myqsos.csv" and show ALL IOTA stats summary.
2) It reads exported adif and show Worked IOTA summary.
<Install>
1) Place SummaryIOTAMini.exe, SummaryIOTAMini.ini, ai.txt, bi.txt and wi.txt anywhere you prefer.
2) Minimum number of groupes needed for each award may be changed by IOTA in feature. You need to edit these changes in SummaryIOTAMini.ini.
<How to use>
1) open SummaryIOTAMini
2) You are always asked "you use existing myqsos.csv or download latest myqsos.csv" If you use existing (previously downloaded) myqsos.csv then follow next steps.
3) Click "File" and "Open".
4) It shows stats table. "WD" means World Diploma.
5) You may change color setting. (Default setting are just a sample.) Click "Background".
6) Color settings are saved in SummaryIOTAMini.ini.
a. Awarded: You have already awarded.
b. Ready to be awarded: You can aply credit for the award as you have already confimed QSL needed for the award and added QSO in IOTA database.
c. Nothing special: backcolor except for a and b.
d. Header: header color.
e. Form: Form background color.
If you want to download latest myqsos.csv then follow next steps.
7) Clicl "Download".
8) Your browser shows IOTA Home Page.
9) Download your latest myqsos.csv. Open Excel with myqsos.csv and save it in the SummaryIOTAMini folder as myqsos.csv.
10) You are always asked "Do you want to see Total of IOTAs worked ?" in step 2). If "yes" then follow next step.
a. Click "File" and "Open ADIF file"
b. Select your adif exported by Logger32. You should export with "Include logbook informationall entries" UNCHECKED.
c. Total of IOTAs worked table is displayed.
d. QSOs sorted by IOTA reference number (default). Clicking IOTA or Date in title line will sort by IOTA reference number
or Date.
e. Backcolor edting is not allowed. Title line and form backcolor are derived by setting in primary table described above.
f. If you want to see IOTA Marathon summary then click "Marathon" This table shows all IOTA QSOs after 2012-01-01.
QSOs with light blue backcolor means it is invalid for IOTA Marathon point. Max 3 points for same IOTA is valid.
g. If you want to export CheckIOTA.txt" for CheckIOTA then click "File" then "Export CheckIOTA.txt". CheckIOTA.txt is written in
CheckIOTAMini.folder.
<Known problem>
RSGB seems to provide myqsos.csv with LF (or CR) instead of popular CR/LF.
If you open downloaded myqsos.csv with Windows NotePad then you see all data is showed just in ONE line. This is not good for SummaryIOTAMini.
You should open Excel with myqsos.csv first when you download this file. SummaryIOTAMini read saved myqsos.csv correctly .
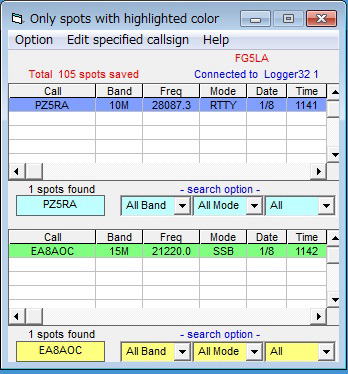
CheckSpot ver2.5.2 2012/1/8
CheckSpot is useful to check how the callsign you are interested has been spotted. (Freq ? Mode ? and Time ?)
It works ONLY together with Logger32 (after ver 3.35.0)
<General feature>
1) It receives DX spot adif from Logger32 when Logger32 displays DX spot in DXSpot window.
2) It saves received adif in CheckSpot.txt which is created in the same folder as CheckSpot.exe. (Append mode)
3) You can select save mode. (after ver2.5.2)
a. All: All spots received are saved in CheckSpot.txt
b. Only spots with highlighted color: Only highlighted color spots (may be your interested spots) are saved.
c. Only spots with specified callsigns: Only sots with specified callsigns are saved. You can specify any callsigns, HK0NA, 3D2YA, A35AY etc etc.
Specified callsigns are saved in CheckSpotCall.txt in the same folder as CheckSpot.exe.
4) If you put a specific callsign in callsign box (e.g. T32C, YJ0VK, OJ0X etc) then it shows matched data in the table reading CheckSpot.txt.
5) This table is refreshed when it receives DX spot adif which has a exactly matched callsign as one entered in callsign box.
note: It does not refresh if you put callsign with wild card !.
6) Each line is back-colored with same color as in Logger32 DXSpot window.
7) Left-clicking any spot in the table tranffers callsign in Logbook Entry window and canges Radio Frq/Mode.
8) Aux table is provided.
<Install>
1) Unzip downloaded package. You have CheckSpot.exe and this ReadMe.txt.
2) I recommend you to place CheckSpot.exe in a dedicated folder. Setup CheckSpot as one of utility program
<Initial setting>
1) Open Logger32 first and run DX Spot window to display DX spots.
2) Open CheckSpot from Logger32 utility menu. Direct clicking may not open CheckSpot properly.
3) Move window anywhere. Window is re-sizeable. If you prefer then check "Always on Top" (option menu) You must check "MM/DD" or "DD/MM" Default is "MM/DD"
4) If it does not find CheckSpot.txt then it creates empty CheckSpot.txt in the folder.
5) If it does not find CheckSpotCall.txt then it creates empty CheckSpotCall.txt in the folder. You see "Empty !" just above table.
6) Look at just above table. If it shows "Connected Logger32 n" then it is ready to receive DXSpot adif from Logger32. n=1 or 2 or 3 or 4 or 5.
7) If you are lucky then you see callsign with red color just above table. It is DX spot callsign received from Logger32.
8) Click "Option" , "Save option" and check "All" of 3 save options.
9) Close CheckSpot by clicking "X"
<How to use search option>
1) Open CheckSpot and confirm that it comes with your setting.
2) As save option is "All" you see all spots callsign received from Logger32 just above table.
3) Click "Opion". Click "Aux" then you see 2 tables. Click "Aux" again you see 1 table.
4) Click callsign box then it clears. Put "*" in the box. You see all spots received in the table. ("*" is a wild-card)
5) Try to change each search option, "All Band", "All Mode" and "All"
6) In the callsign box, try to put a specific callsign which has been received.
7) Wild-card "*" can be used in callsign box. If you put "JA*" then you see all spots with callsign JA*"
8) Clicking callsign box always clear the box.
<How to use save option>
1) Click "Option" then "Save option". You can select one of 3 options.
a. All: All spots received are saved in CheckSpot.txt
b. Only spots with highlighted color: Only highlighted color spots (may be your interested spots) are saved.
c. Only spots with specified callsigns: Only spots with specified callsigns are saved. You can specify any callsign, HK0NA, 3D2YA, A35AY etc etc.
2) You always see which option is selected on title bar.
3) Total number of saved DX spots is displayed just above table.
4) If you want to use "Only spots with specified callsigns" try following steps.
a. Click "Edit specified callsigns" then "Open edit window". A small window appears.
b. Put any callsigns in the window. One callsign per line. No need to hit Enter-key. Just click next line to put next callsign.
c Click "Close edit window". This small window disappears.
d. Now only spots with specified callsigns are saved. Specified callsigns are saved in internal "box" and finally in CheckSpotCall.txt when it close.
<Other function>
1) You can delete CheckSpot.txt at anytime when it includes plentry of unnecessary DXSpots. (after a specific DX Pedition finish)
Click "Delete CheckSpot.txt". You see "Empty " instead of total number of saved spots.
2) Click "Option" then "Beep". You notice beep when it receives DX spot adif from Logger32.
3) Click "Option" then "Hold off auto refresh" to interrupt auto refresh.
<Note>
1) DX spot adif is filtered by Logger32 Blocking filter. Band and Mode is derived from Logger32 Band/Mode table.
2) Date(UTC) is calculated reading PC system date/time and Time zone when CheckSpot receive DX spot. It is not related to Time received from Logger32.
3) It shows max 5000 spots in each table.
<Version History>
ver2.5.2 2012/1/10
1) Added save option
2) Bug fix.
3) Changes in appearance.
ver2.3.2 2011/17
1) "Aux" flag is saved in CheckSpot.ini
2) "Callsign" and search option last used are saved in CheckSpot.ini.
3) Max number displayed in table is 5,000. (previouly 1,000)
4) Changes in appearance.
5) Column width adjustable for Aux table.
ver2.3.0
1) Re-wrote code to implement Aux table.You can see Main and Aux table.
2) Click "Aux" in option menu to show both table. Re-click "Aux" to hide Aux table.
3) Date added for search option. (All or Today)
4) ALT+W removed.
5) Right click on table removed, instead "Hold off auto refresh" added in option menu.
6) Dafault Date format is DD/MM. When CheckSpot open for the first time option "DD/MM" is checked.
7) Check "Beep" in option menu to enable Beep when it receive DX Spot adif from Logger32. If you do not want Beep then un-check "Beep"
8) Changes in appearance.
ver2.1.6
1) Band "GENE" added
2) Wrong data saved in CheckSpot.txt. Bug fixed.
3) If CheckSpot.ini save wrong "Top"/"Left" then it opens at most Top/Left position. Now yo do not miss CheckSpot.
ver2.1.5
1) Text format changed in CheckSpot.txt. Unnecessary CR/LF removed.
2) When put only "*" wild card at top did not work properly. Bug fixed.
3) Total number of spots saved in CheckSpot.txt is displayed on title bar. e.g "47/2864 spots found". 47 is matched spots and 2864 is total spots saved in CheckSpot.txt.
ver2.1.4
initial public release 2011/10/29
1) The window's Height/Width is re-sizeable and saved in CheckSpot.ini.
Version 2.1.3 (Beta)
1) It search matched spots when you put any letter in callsign field or select Band/Mode. (No need to hit ENTER key)
2) Band/Mode selection changed. Simply select Band/Mode from drop-down menu.
3) Minor changes in appearance.
Version 2.1.2 (Beta)
1) Date column added
2) Improvement in stability when clicking table.
3) Clicking column header and empty row is invalid.
4) Code changed to improve refresh speed.
5) "Delete CheckSpot.txt" added. (Option menu)
6) Wildcard added when checking callsign. Use JA*, IK*, *NL* etc etc. "*" only in callsign box is invalid.
7) Right-clicking shows popup menu. "Hold off auto refresh" checked will interrupt refresh when receiving DX spot.
8) Date format selection added. MM/DD or DD/MM (Option menu)
9) Always on Top is now selectable. (Option menu)
10) Always on Top, window's position and Date format are saved in CheckSpot.ini.
11) Minor changes in appearance.
12) Table is cleared when CheckSpot.txt is deleted.
13) Tool chips added.
Version 1.0.0
Intial Beta release 2011/10
SummaryMini ver2.3 2012/1/21
SummayMini ver2.3 is revised version of Summary.xls. It reads Logbook ADIF exported by Logger32 and simply shows following Table and Chart. Char may not work at all with Windows 7 system.
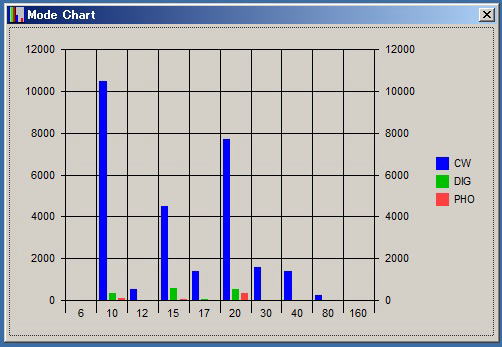
1) QSOs/Band/Mode Table. Band is limited to 160, 80, 40, 30, 20, 17, 15, 12, 10 and 6M. Mode is limited to CW, DIGital and PHOne. DIG is RTTY/PSK31/PSK63. PHO is SSB/AM/FM. Other Band and Mode is showed in Others cell.
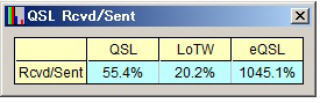
Clicking QSL Rcvd/Sent in Option menu shows Rcvd/Sent percentage Table.

2) QSOs/Band/Mode Chart.
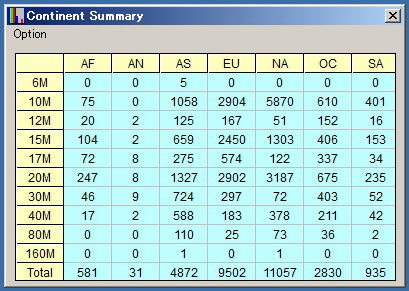
3) QSOs/Band/Continent Table. QSOs on other Bands is ignored.
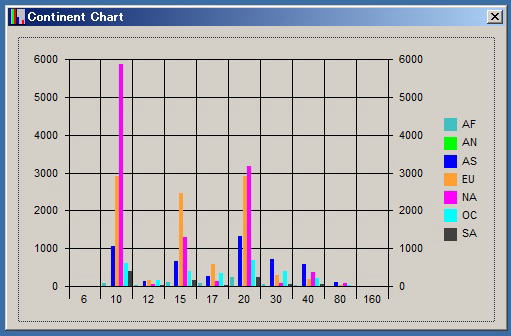
4) QSOs/Band/Continent Chart.
<Install>
1) Unzip SummaryMini.zip and place SummaryMini.exe anywhere you like.
2) If MSCHRT20.ocx is not in your system then Chart will be not displayed. If you want to see Chart then copy/paste attached MSCHRT20.ocx in Windows folder.<How to use>
1) Prepare your Logbook adif.
2) Open SummaryMini. Select your Logbook adif first.
3) You see QSOs/Band/Mode Table and DXCC/WAC/WAZ_Worked Table. Click QSL Rcvd/Sent in option menu. You see QSL Rcvd/Sent Table.4) Click Option and Chart. You see QSOs/Band/Mode Chart. Click "X" to close this Chart.
5) Click Option and Continent summary. You see QSOs/Band/Continent Table.
6) Click Option and Chart. You see QSOs/Band/Continent Chart. Click "X" to close this chart.
7) Click "X" in QSOs/Continent Table to close.